In this article:
- Snowflake Overview
- The Chain.io Snowflake Connection
- Viewing the Chain.io Canonical Model
- Integrating Snowflake with Chain.io
- Adding a Snowflake Host System or Integration Connection to a Flow
Snowflake Overview
Snowflake provides a cloud-based data platform that supports the storage, management, and analysis of large data sets in an efficient and secure way. This digital warehouse offers greater flexibility of data management and accessibility compared to data managed through traditional data centers. Snowflake's compatibility extends to multiple cloud providers like Amazon Web Services (AWS), Microsoft Azure, and Google Cloud, making it versatile and easy to integrate with existing cloud services.
Snowflake is popular in industries where large-scale data processing and analytics are integral to business processes, such as finance, healthcare, and retail.
Advantages of Snowflake’s technology include:
- Scalability: Database management grows with your organization's needs.
- Data Sharing: Easy and secure data sharing across different teams and organizations.
- Speed: Optimized for fast processing of data queries with large datasets.
- No Maintenance: Data management occurs on the cloud without the need for server or hardware upkeep.
Snowflake's platform enables you to turn mountains of raw data into implementable conclusions without the complexity of traditional data management systems.
The Chain.io Snowflake Connection
Our connection to Snowflake allows Enterprise shippers to have actionable insights with comprehensive historical shipment data stored within Snowflake. Businesses can track the evolution of their shipments over time, uncover trends, and make informed decisions to optimize operations. The ability to preserve each version of shipment records with timestamps ensures data integrity for accurate audits and regulatory compliance.
Collaboration across the supply chain is streamlined by providing consistent, version-controlled data to all partners. Teams can access current and historical shipment data, minimize miscommunication, and improve coordination. Disputes are resolved faster with a complete, transparent history of shipment records, which allows discrepancies to be addressed quickly.
Financial accuracy is also improved through precise audit and payment processes. With Snowflake's detailed shipment data storage, customers can ensure billing aligns with records, thus optimizing freight spend. Additionally, enterprise shippers can integrate CO2 emissions and risk data to make promote sustainability and risk mitigation.
By consolidating shipment data into a unified system, Snowflake and Chain.io, help shippers create a single ledger of accurate data. This centralized system also integrates supply chain data with other organizational information, offering executives a holistic view of operations to drive strategic decisions.
Viewing the Chain.io Canonical Model
The Chain.io Canonical model streamlines communication between different systems by standardizing data exchange within the Chain.io platform. When files and data structures from different sources are processed, they are converted into the universal Canonical format to enable efficient data sharing across your logistics network. This unified approach reduces complexity, improves accuracy, and ensures smoother collaboration between partners and systems.
For more information on the Chain.io Canonical Model, refer to the Canonical SQL Database Structure support article.
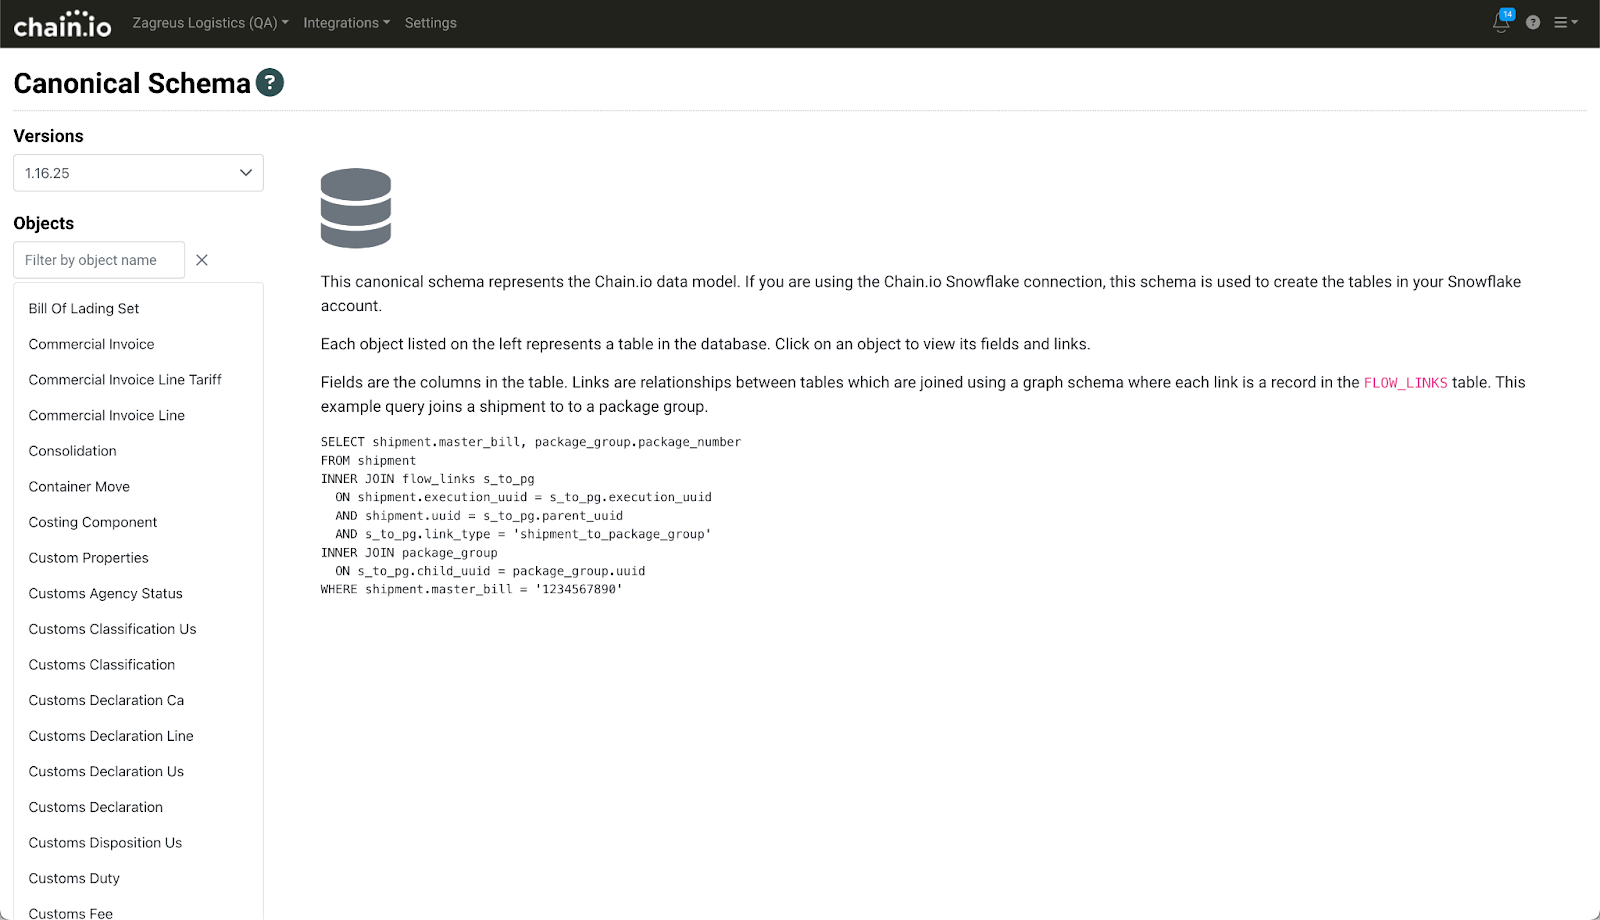
You can view our Canonical model in the Canonical Schema subsection of the Chain.io platform's Developer Center. Coupling Snowflake with the Chain.io platform If you are using Snowflake and Chain.io this area will give you a reference of the schema used to create tables in the database.
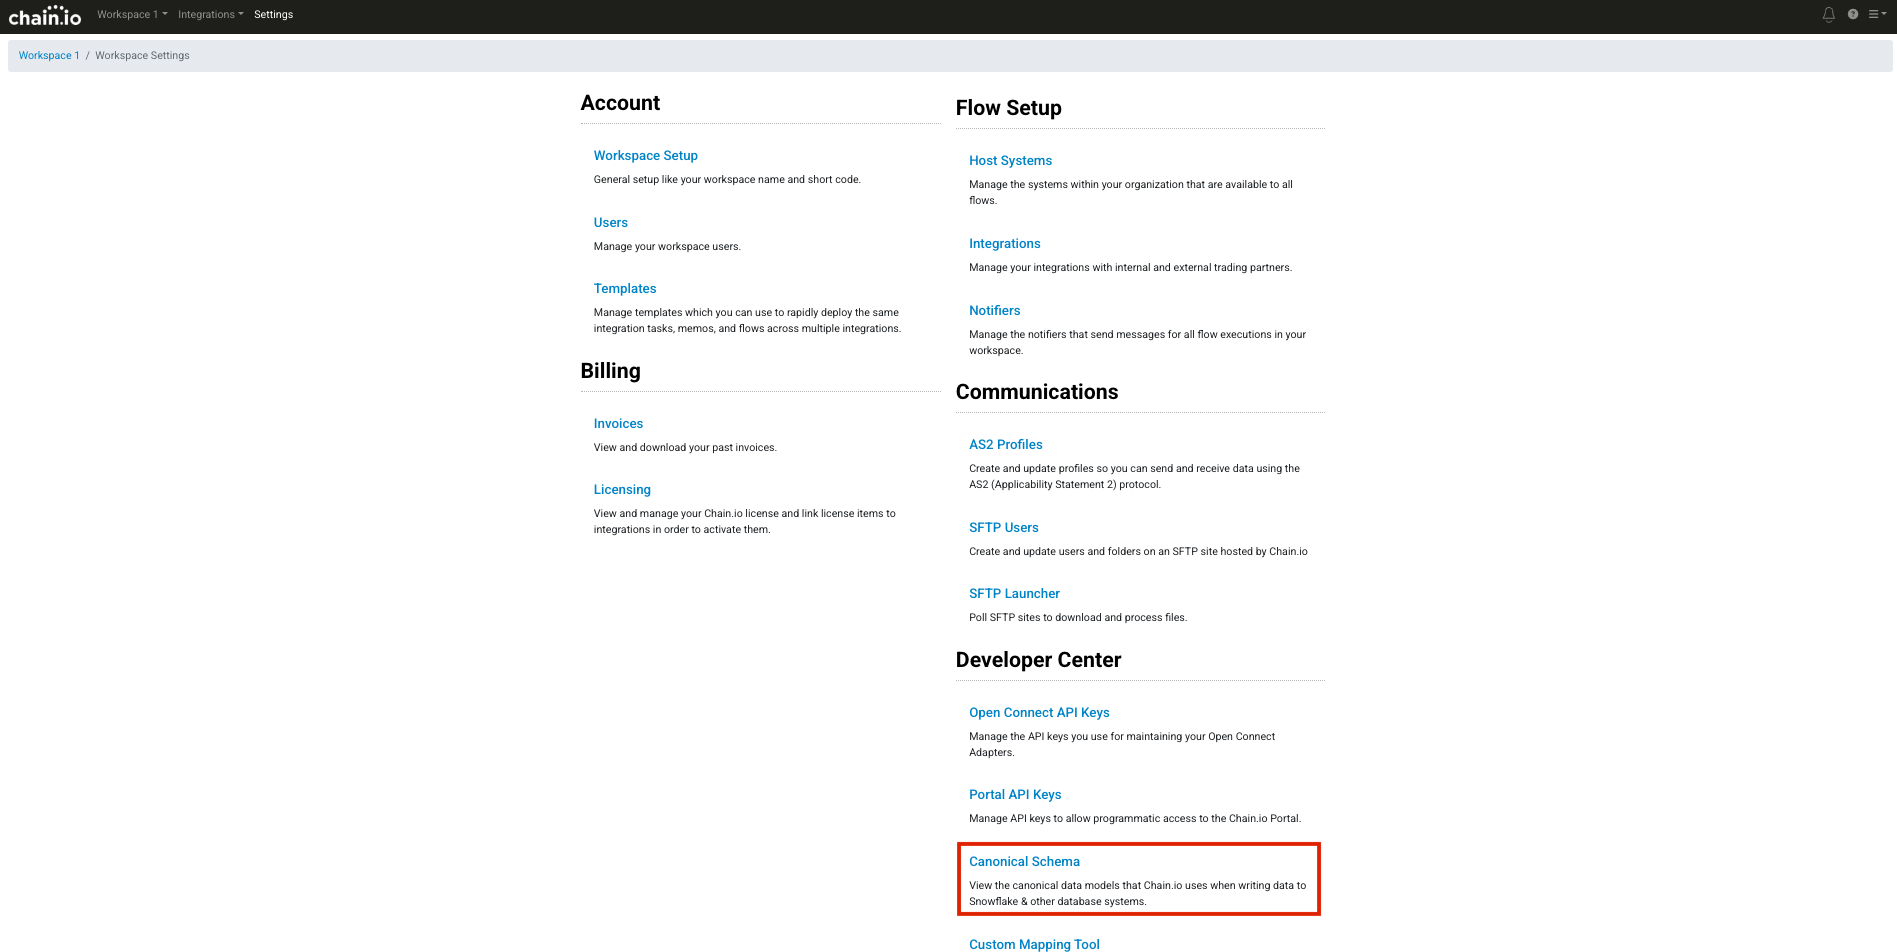
To view the Chain.io Canonical schema, first sign in to your Chain.io platform account at https://portal.chain.io/.
- At the top menu bar, click Workspaces and select the desired Workspace.
- At the top right of the screen, click Workspace Settings from the hamburger menu.
-
Scroll down to Developer Center and click Canonical Schema.
-
To browse the Chain.io Canonical Schema, click items from the Objects menu on the left side of the page.
The related fields will display in the center of the page.
For additional information on Canonical, submit a request at support.chain.io by clicking the Support tab at the bottom of the page.
Integrating Snowflake With Chain.io
To enable communication between Snowflake and Chain.io, establish a host system or an Integration connection within your Chain.io Workspace. A host system is available for use across all Integrations within the Workspace. By comparison, an Integration connection is only available within a specific Integration.
During the process of integrating Snowflake with Chain.io, keep the following browser tabs open:
Snowflake account
Chain.io platform account
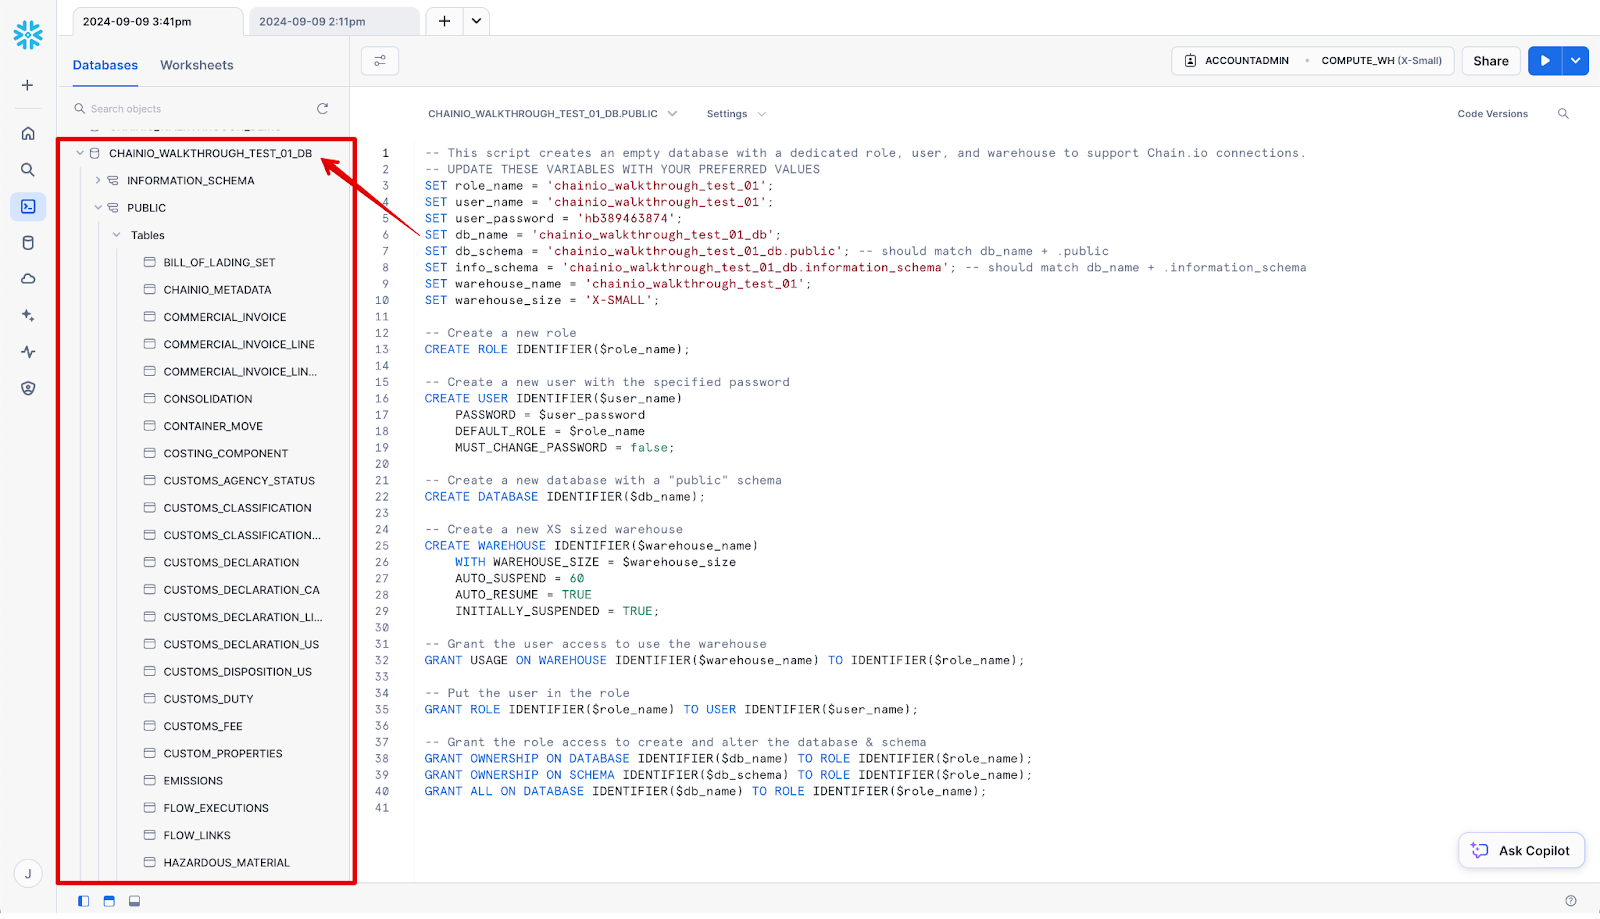
Creating a Database in Snowflake
In order for Snowflake to receive data, you must first create a user, role, warehouse, and an empty database within your Snowflake account. Follow the instructions below to create a database in Snowflake:
- Log in to your Snowflake account at https://app.snowflake.com/.
- On the left side of the page, navigate to Projects.
- Click Worksheets.
- Create a new Worksheet by clicking the “+” button at the top right of the page.
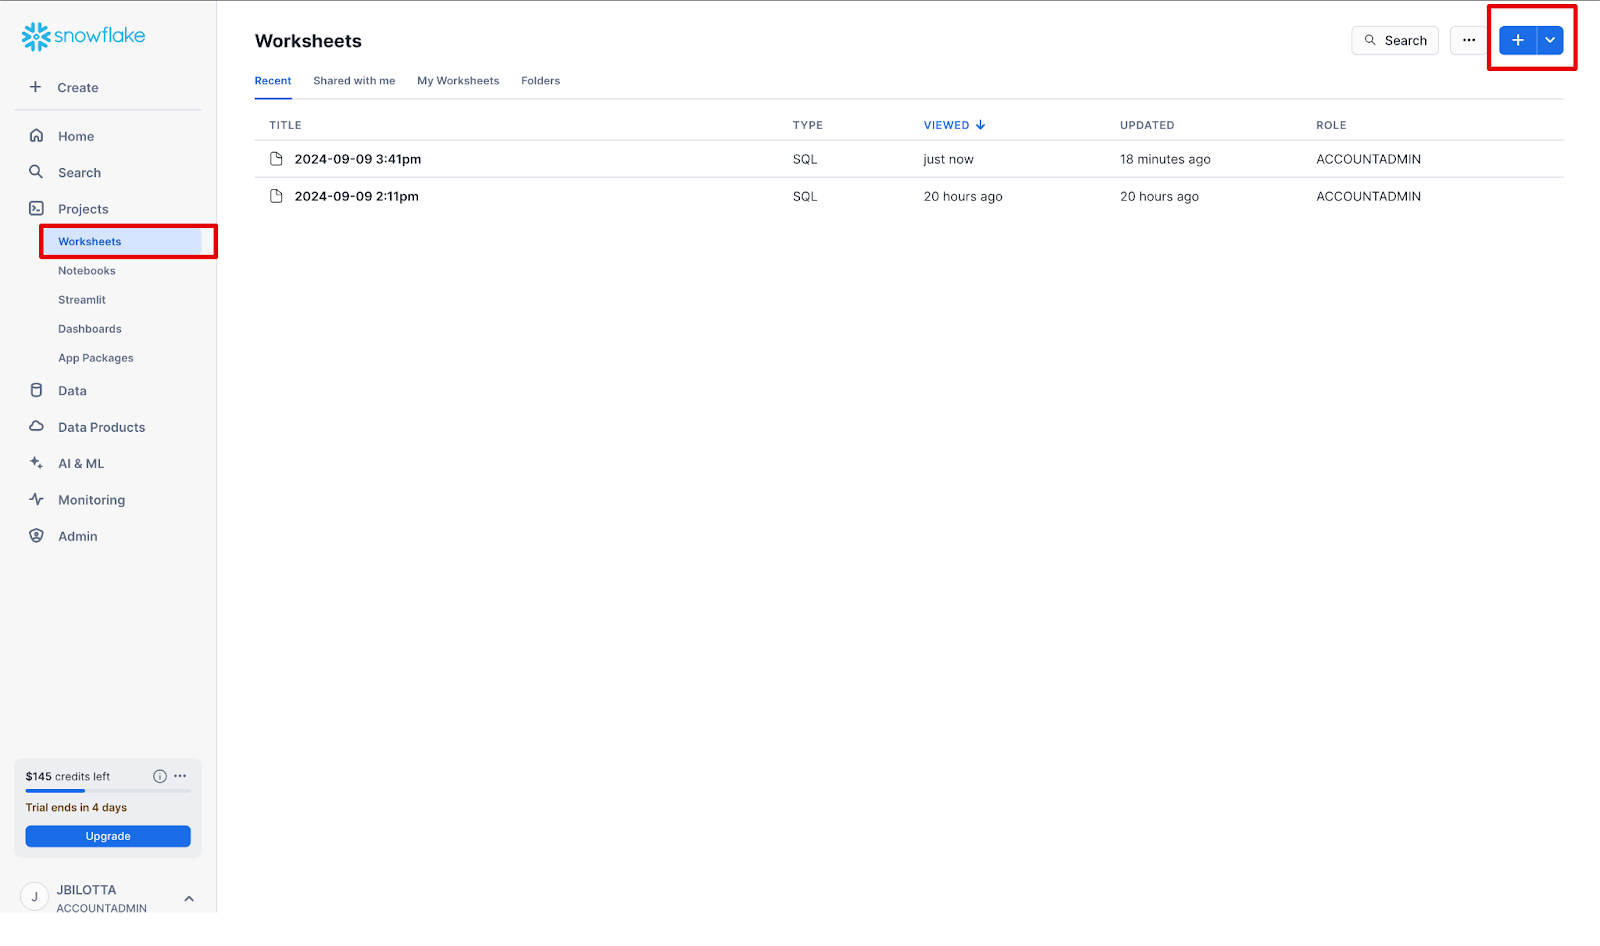
The page refreshes with a new blank worksheet.
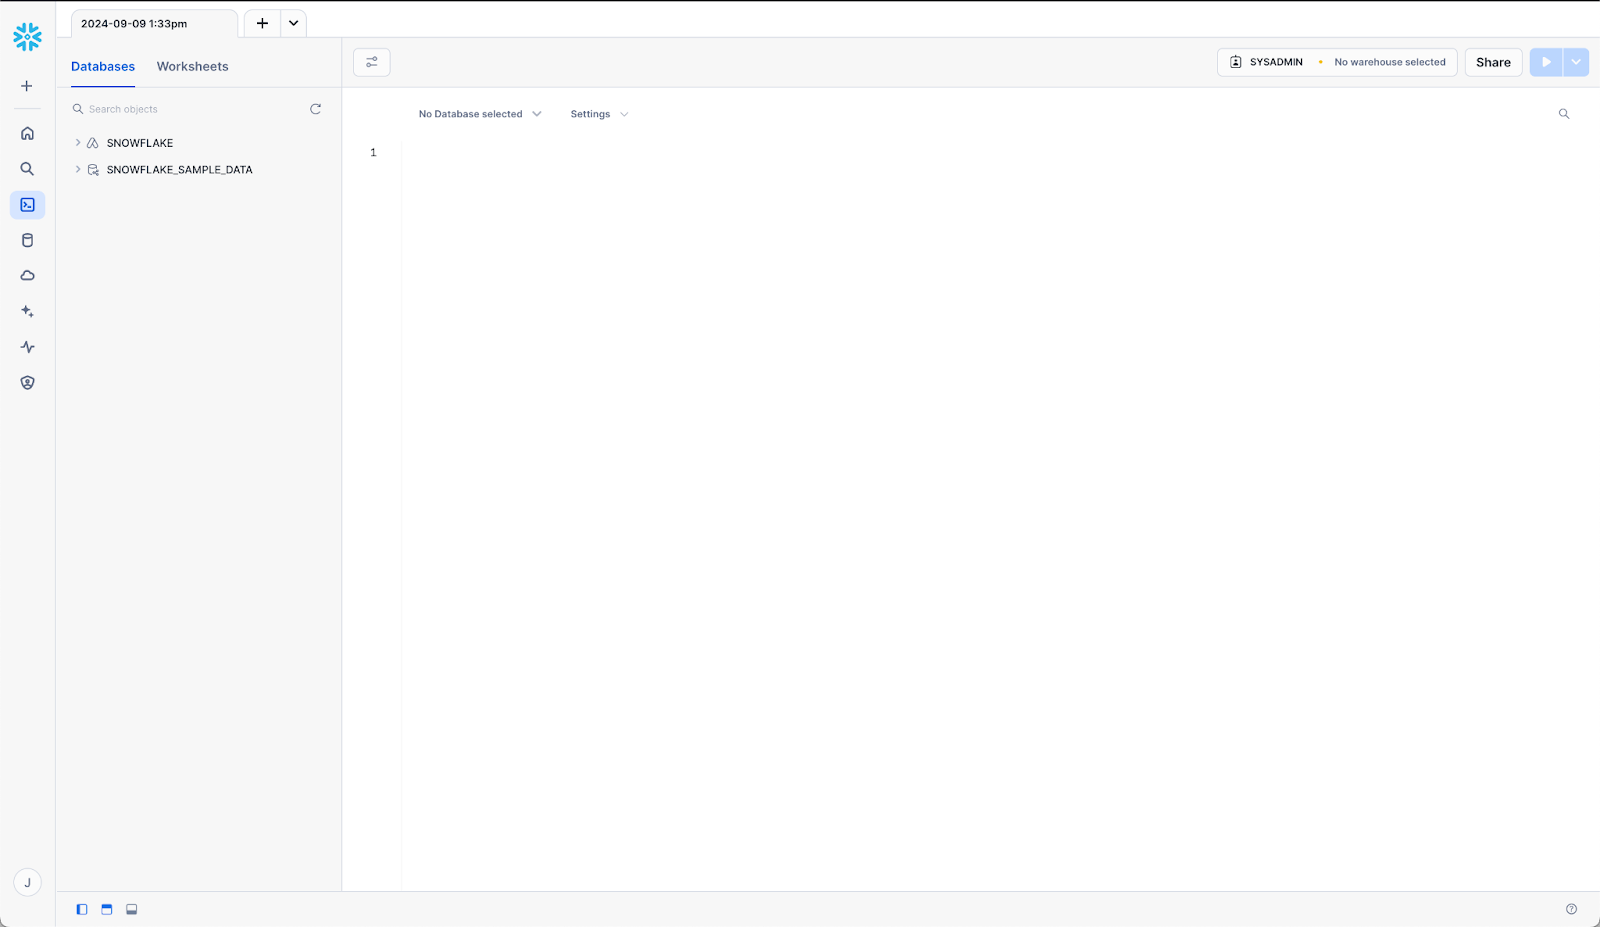
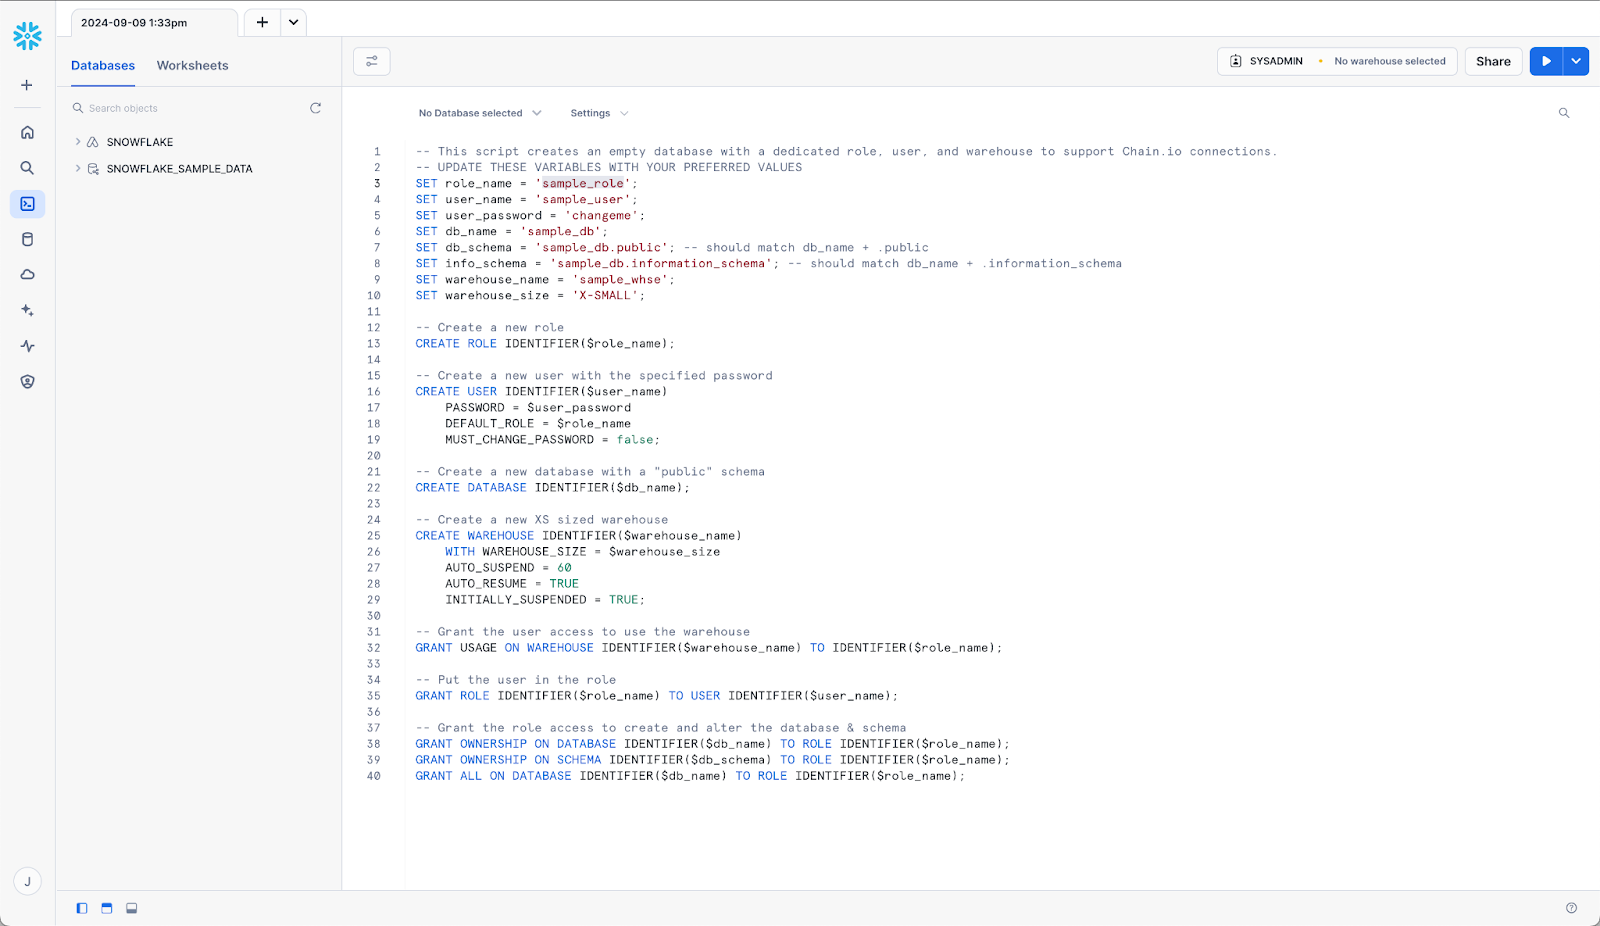
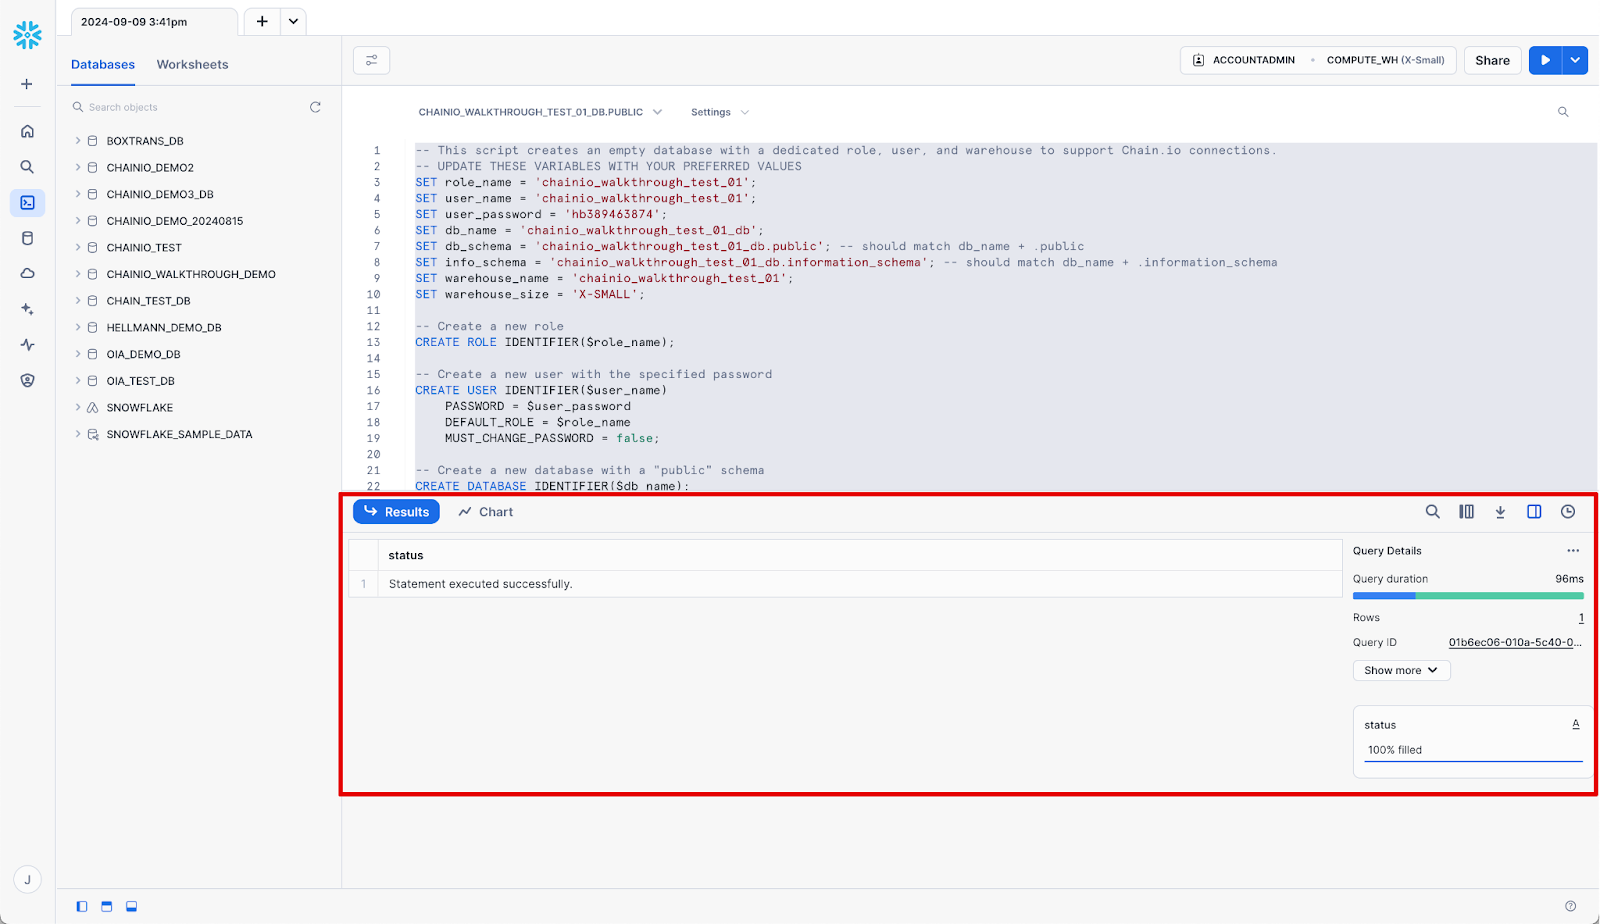
- Copy and paste the script below into the white coding space of the worksheet.
-- This script creates an empty database with a dedicated role, user, and warehouse to support Chain.io connections.
-- UPDATE THESE VARIABLES WITH YOUR PREFERRED VALUES
SET role_name = 'sample_role';
SET user_name = 'sample_user';
SET user_password = 'changeme';
SET db_name = 'sample_db';
SET db_schema = 'sample_db.public'; -- should match db_name + .public
SET info_schema = 'sample_db.information_schema'; -- should match db_name + .information_schema
SET warehouse_name = 'sample_whse';
SET warehouse_size = 'X-SMALL';

-- Create a new role
CREATE ROLE IDENTIFIER($role_name);

-- Create a new user with the specified password
CREATE USER IDENTIFIER($user_name)
    PASSWORD = $user_password
    DEFAULT_ROLE = $role_name
    MUST_CHANGE_PASSWORD = false;

-- Create a new database with a "public" schema
CREATE DATABASE IDENTIFIER($db_name);

-- Create a new XS sized warehouse
CREATE WAREHOUSE IDENTIFIER($warehouse_name)
    WITH WAREHOUSE_SIZE = $warehouse_size
    AUTO_SUSPEND = 60
    AUTO_RESUME = TRUE
    INITIALLY_SUSPENDED = TRUE;

-- Grant the user access to use the warehouse
GRANT USAGE ON WAREHOUSE IDENTIFIER($warehouse_name) TO IDENTIFIER($role_name);

-- Put the user in the role
GRANT ROLE IDENTIFIER($role_name) TO USER IDENTIFIER($user_name);

-- Grant the role access to create and alter the database & schema
GRANT OWNERSHIP ON DATABASE IDENTIFIER($db_name) TO ROLE IDENTIFIER($role_name);
GRANT OWNERSHIP ON SCHEMA IDENTIFIER($db_schema) TO ROLE IDENTIFIER($role_name);
GRANT ALL ON DATABASE IDENTIFIER($db_name) TO ROLE IDENTIFIER($role_name);
The page populates with the new code.
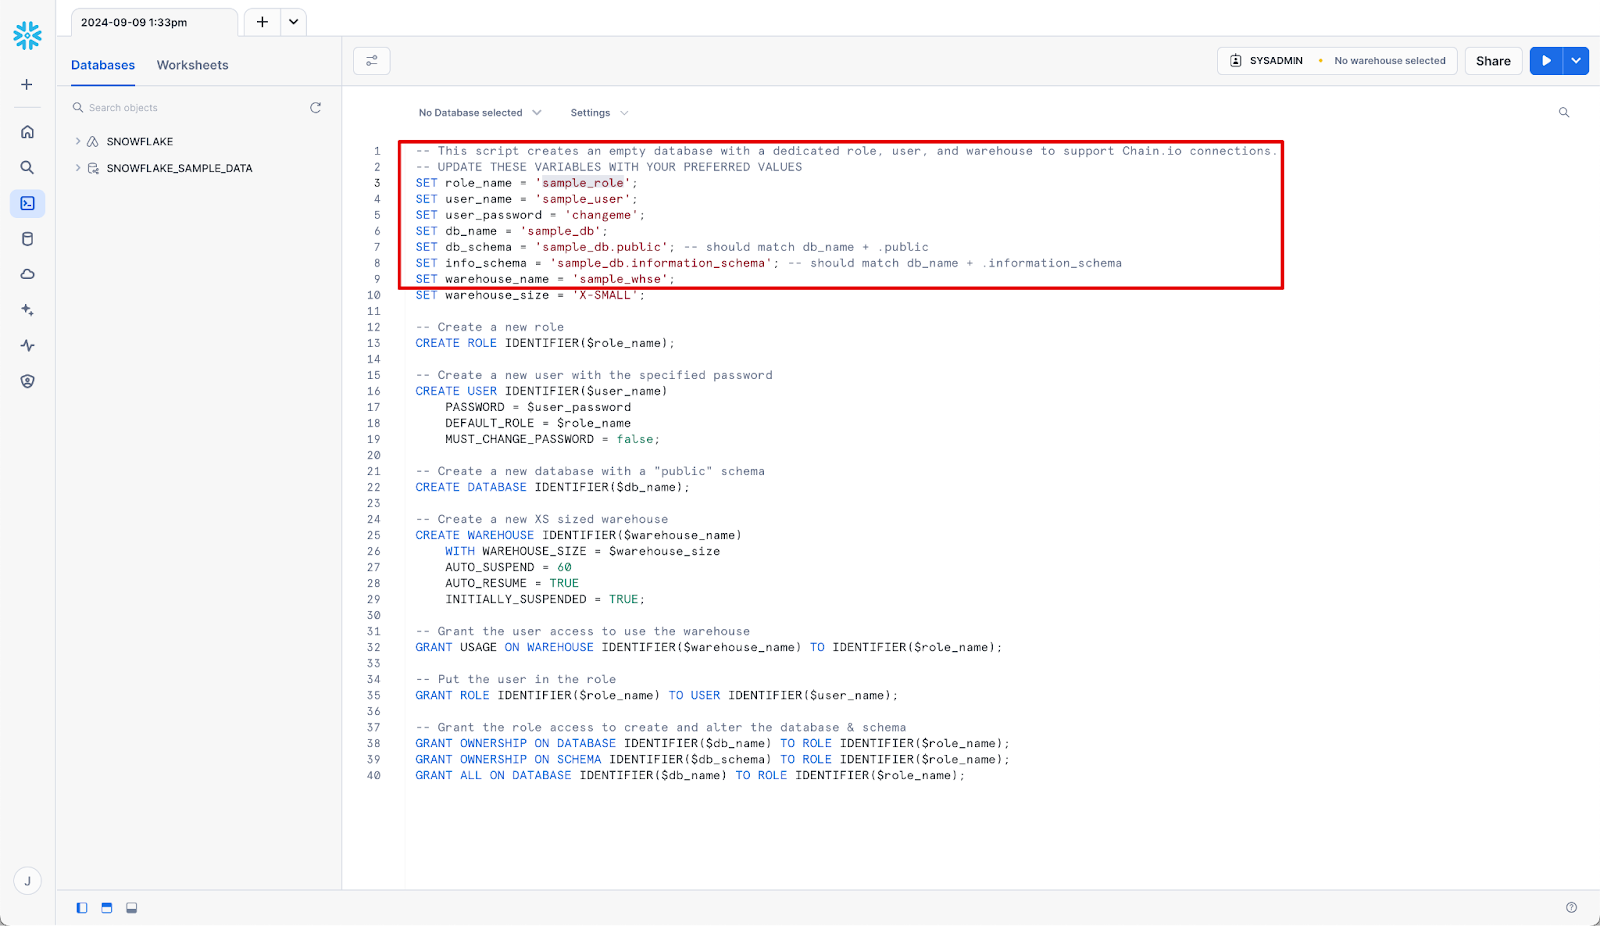
- Edit the variables for the following fields using your own values. Review the comments in the script to help you set the correct values.
- Role name (role_name)
- User name (user_name)
- User password(db_schema)
- Database name (db_name)
- Database schema (db_schema)
- Information schema (info_schema)
- Warehouse name (warehouse_name)
- Once all variables are edited, confirm that the account is set to the correct role and the correct warehouse instance.
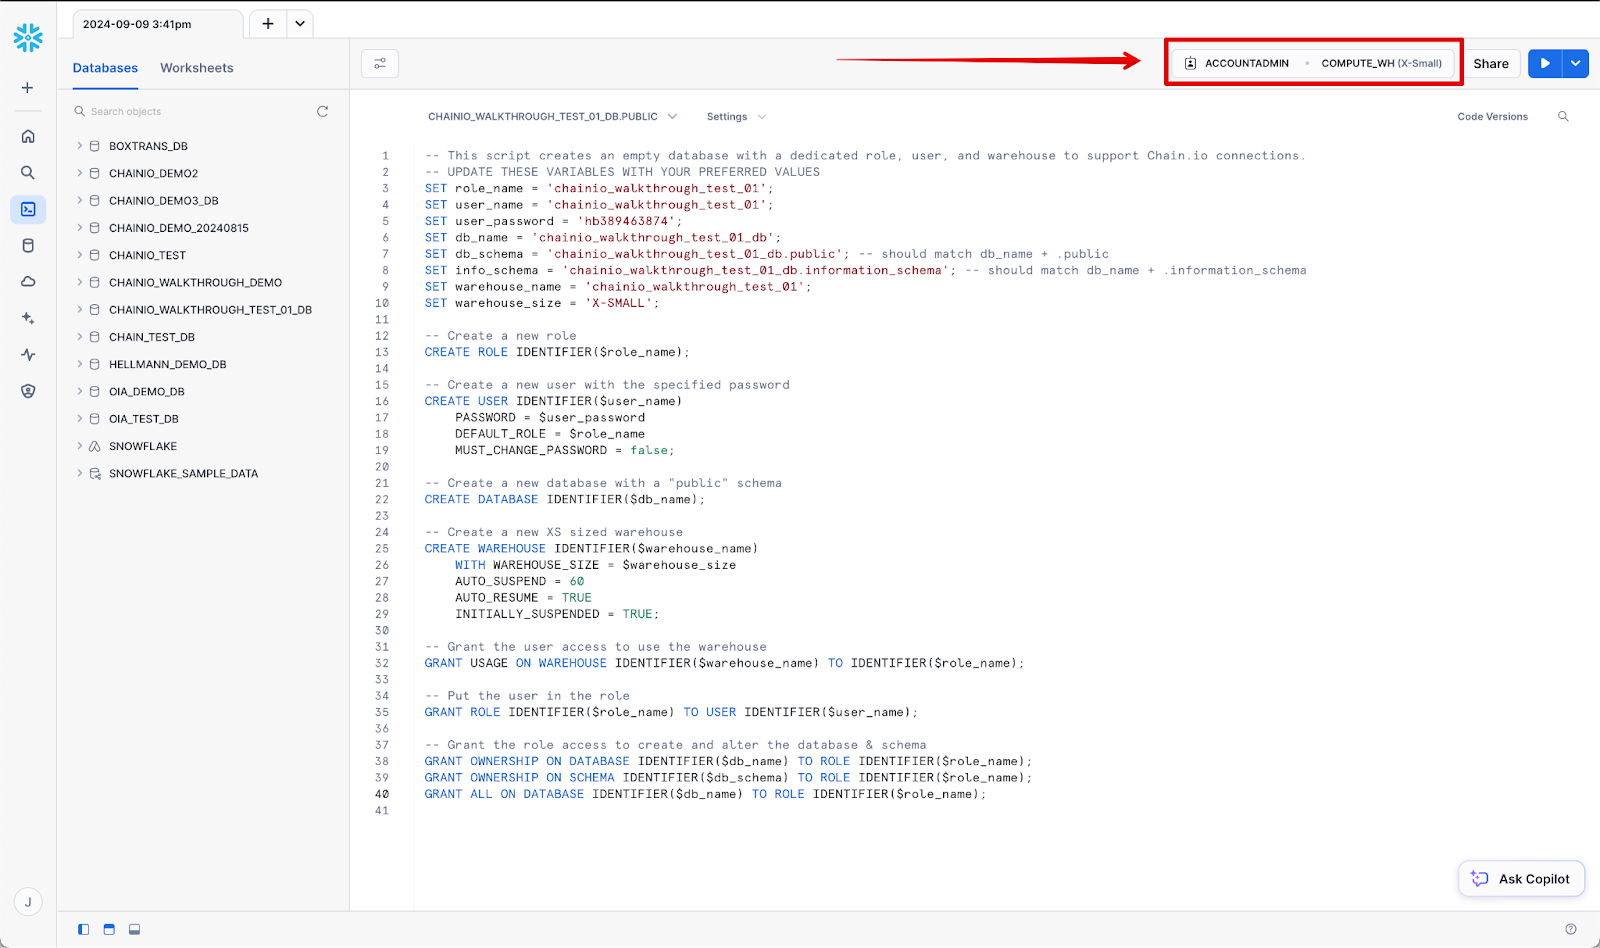
- Select all of the content of the main script panel(Ctrl+A(Win), Cmd+A(Mac)).
- Click the blue Play button in the upper right of the page to execute the script.
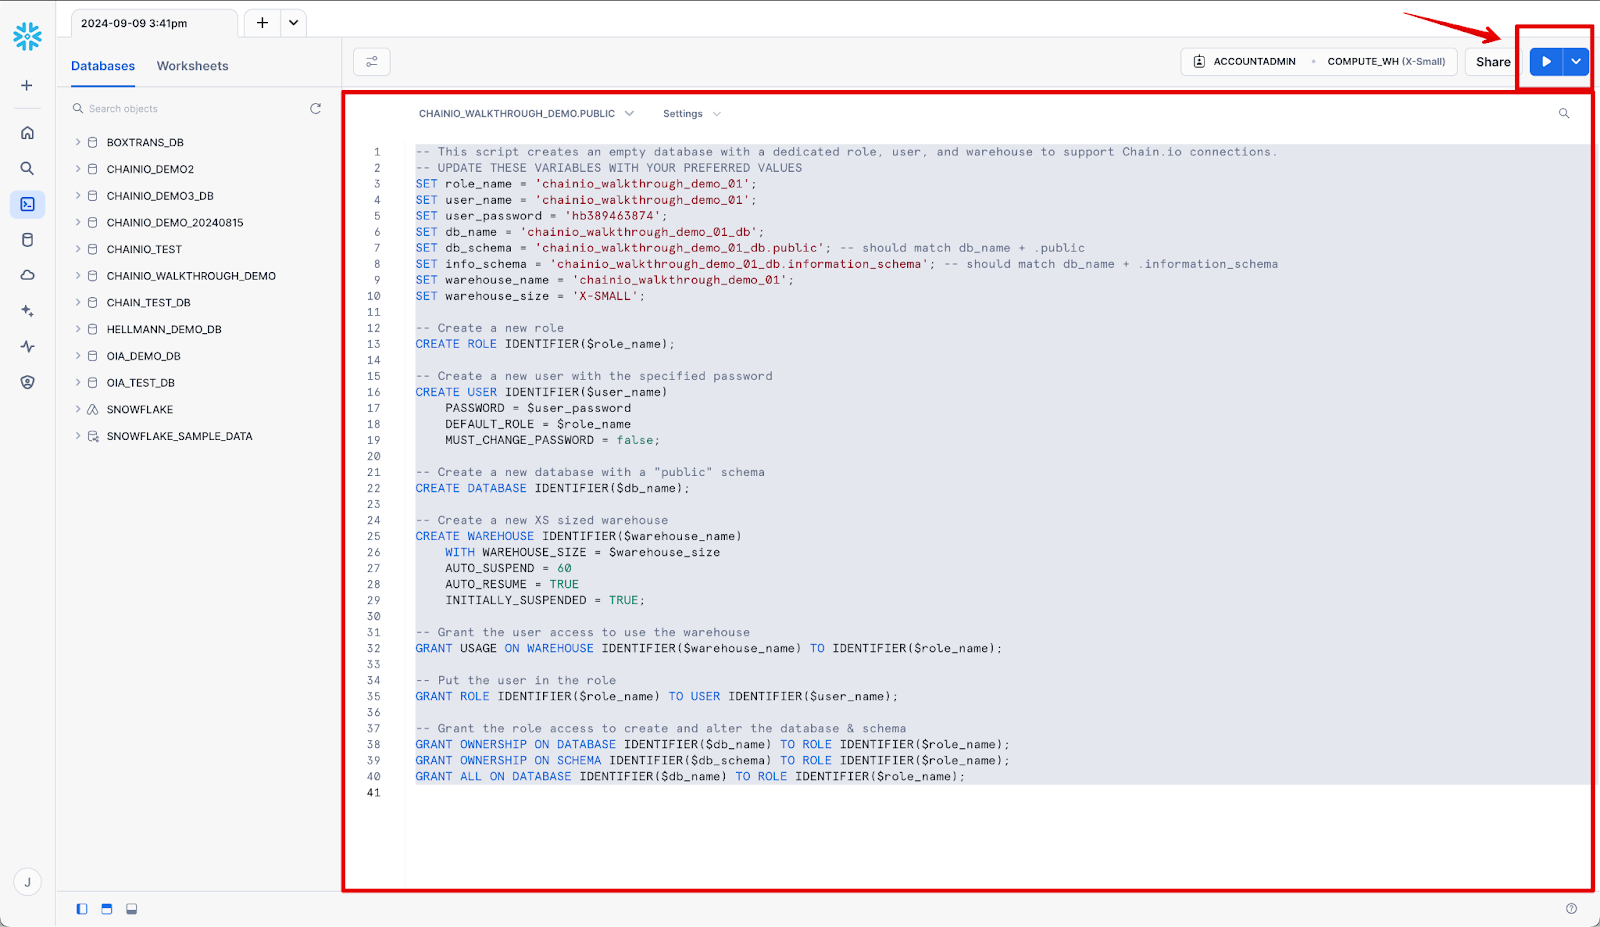
When the script is completed, a panel will appear at the bottom of the page with a summary of the process.
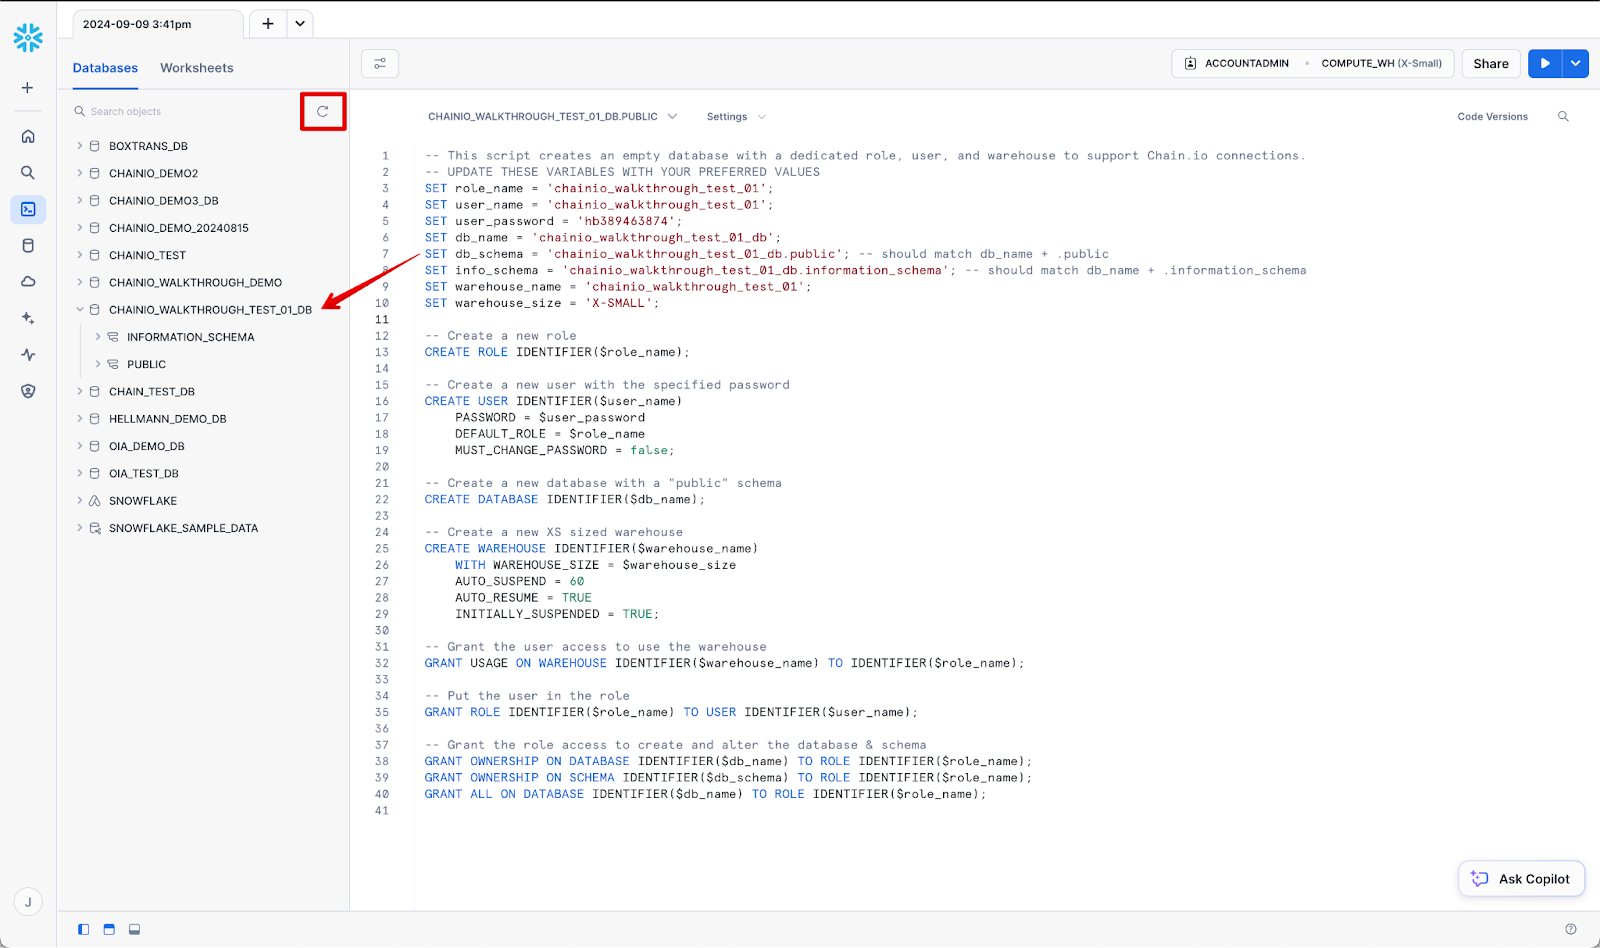
- Click the refresh icon near the top of the menu bar on the left of the window.
- Verify that the new, empty database has been created.
Adding a Snowflake Host System
The first method of connecting a Snowflake database to the Chain.io platform is by adding a host system.
Follow the steps below to create a host system:
- Open a new browser window for https://portal.chain.io/.
- At the top menu bar, click Workspaces and select the desired Workspace.
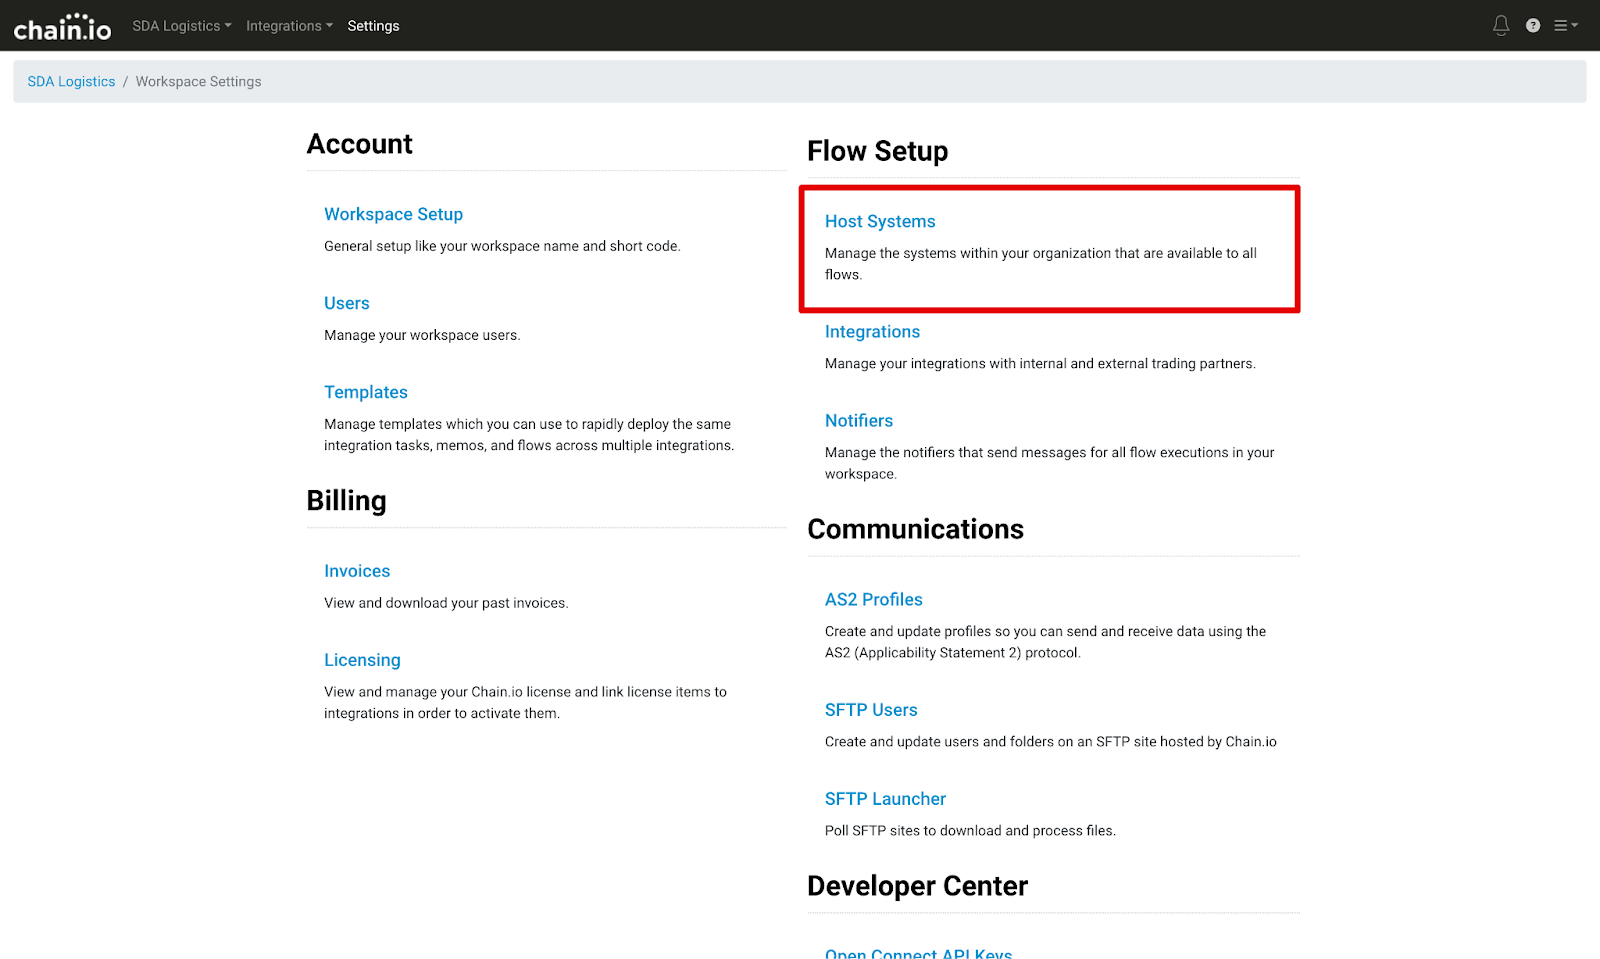
- At the top right of the screen, click Workspace Settings from the hamburger menu.
- Navigate to the Flow Setup section.
- Click Host Systems.
- Click the blue Add Host System button.
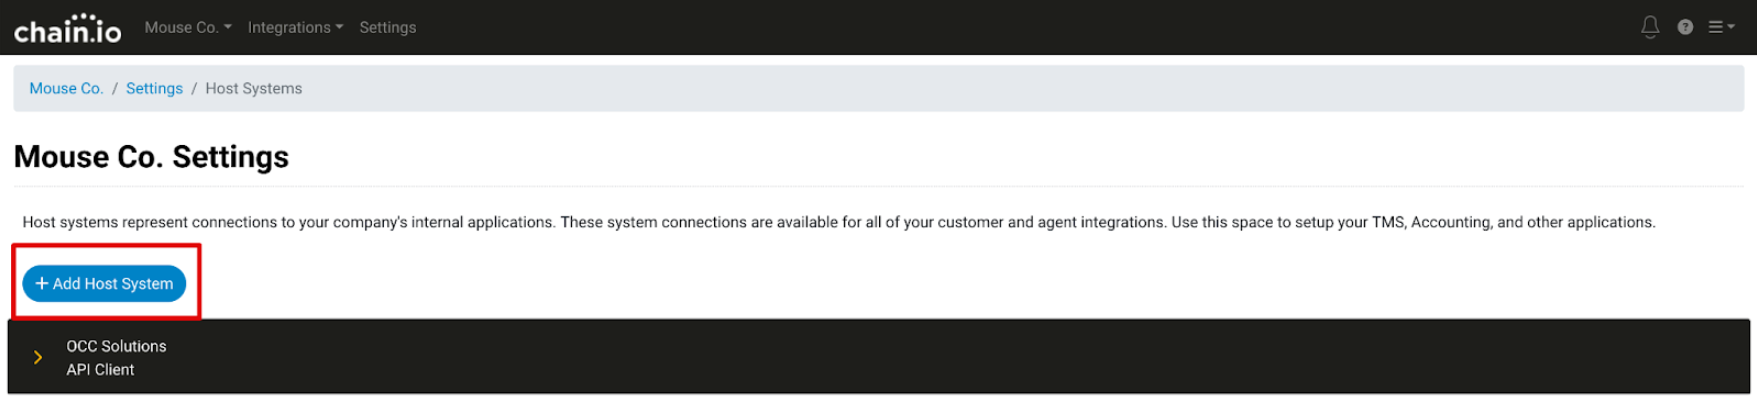
- Select Snowflake from the pop-up window drop-down menu.
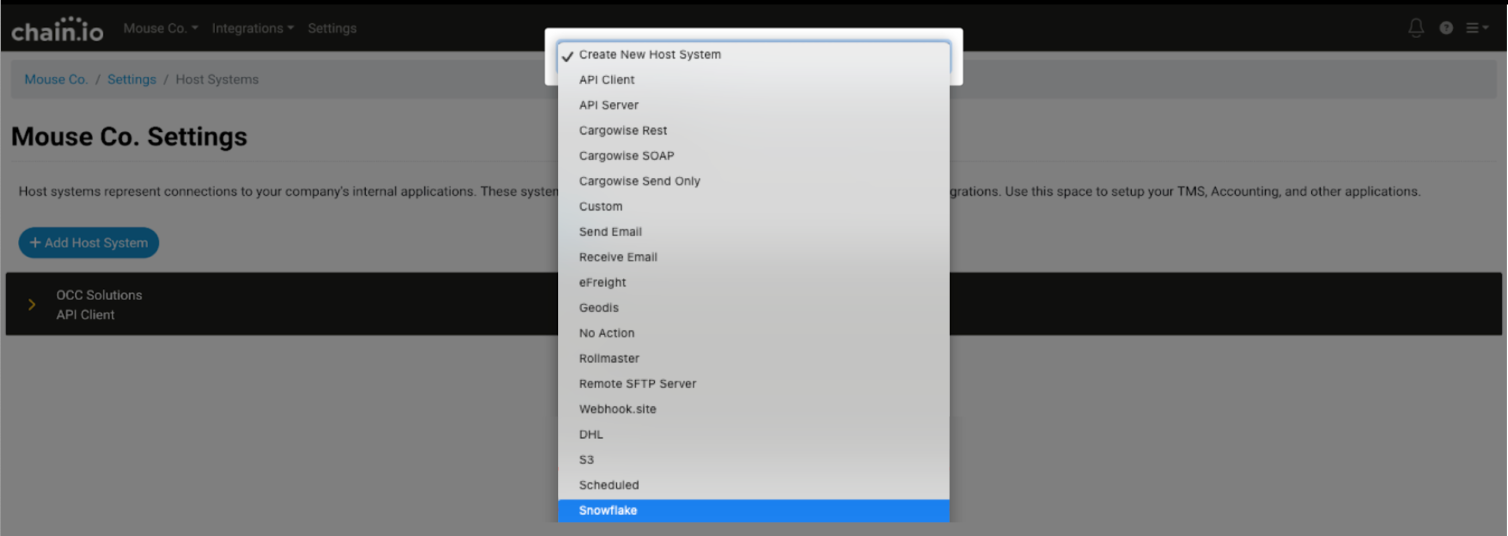
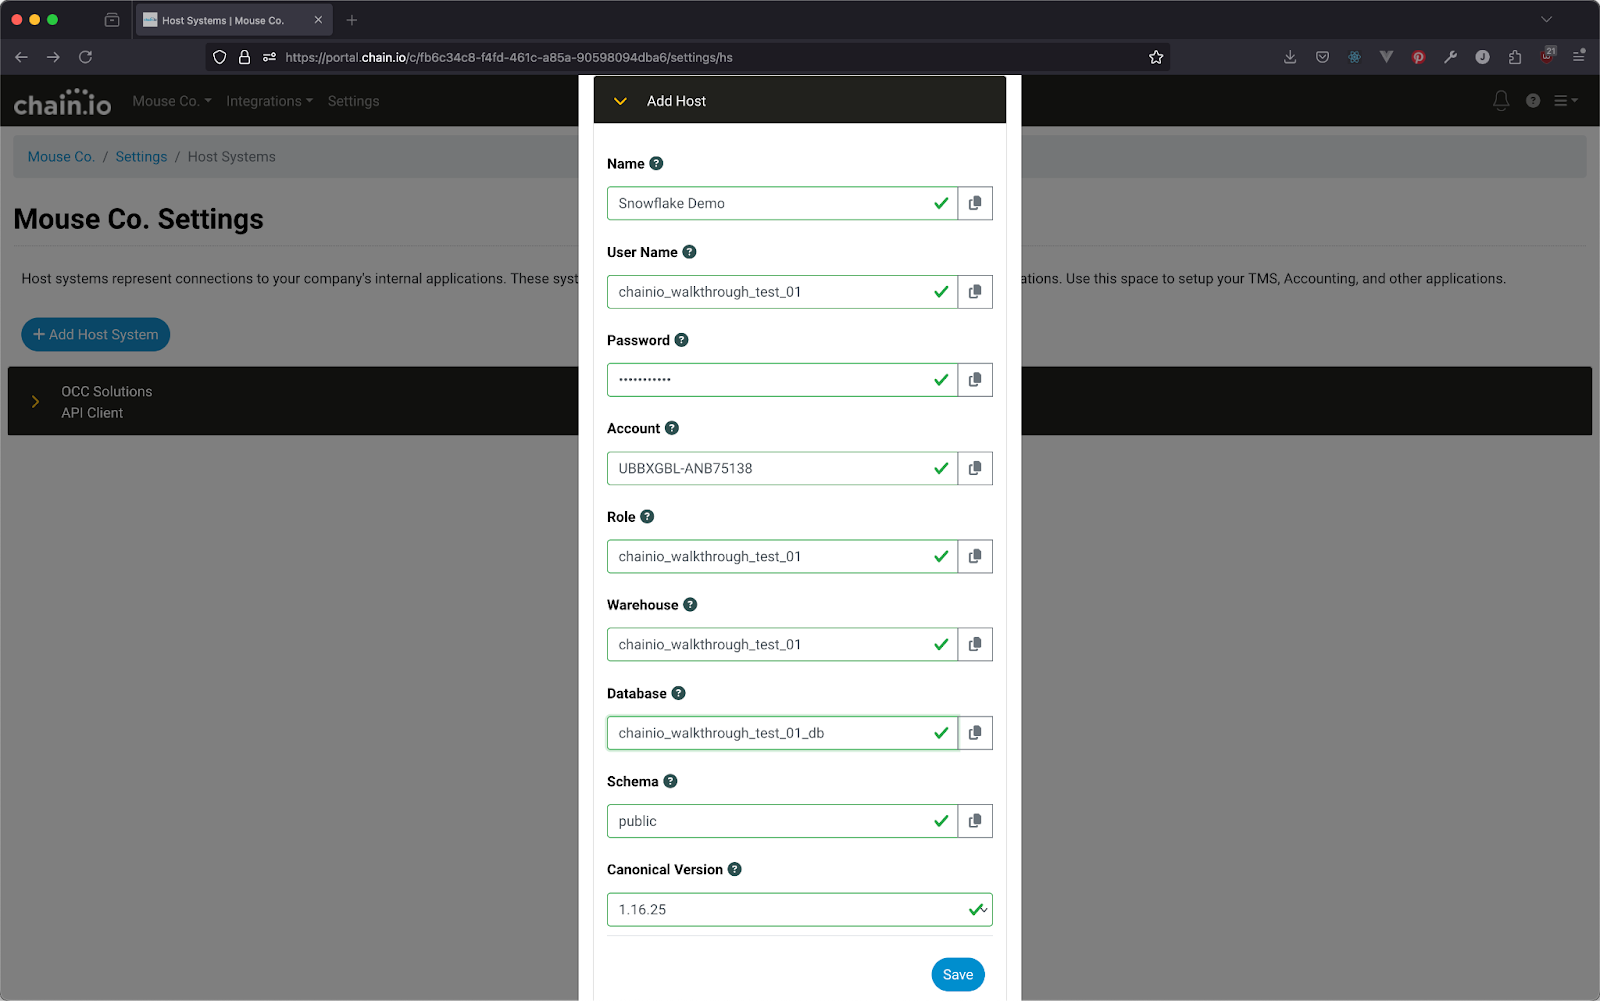
The Add Host form window displays.
-
Copy and paste the equivalent values from your Snowflake worksheet into the fields as shown in the example below.
Snowflake Worksheet Variable Diagram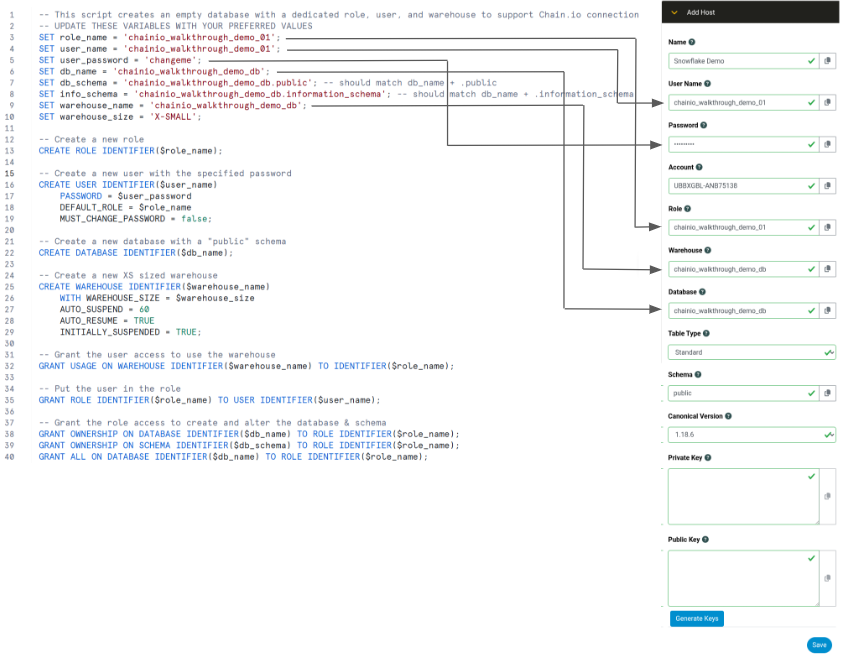
-
Name
A name of your choosing for this host system in the Chain.io platform. -
User Name
The user_name value for your Snowflake Database as it appears in line 4 of your Snowflake Worksheet. -
Password
The user_password value for your Snowflake Database as it appears in line 5 of our Snowflake Worksheet. -
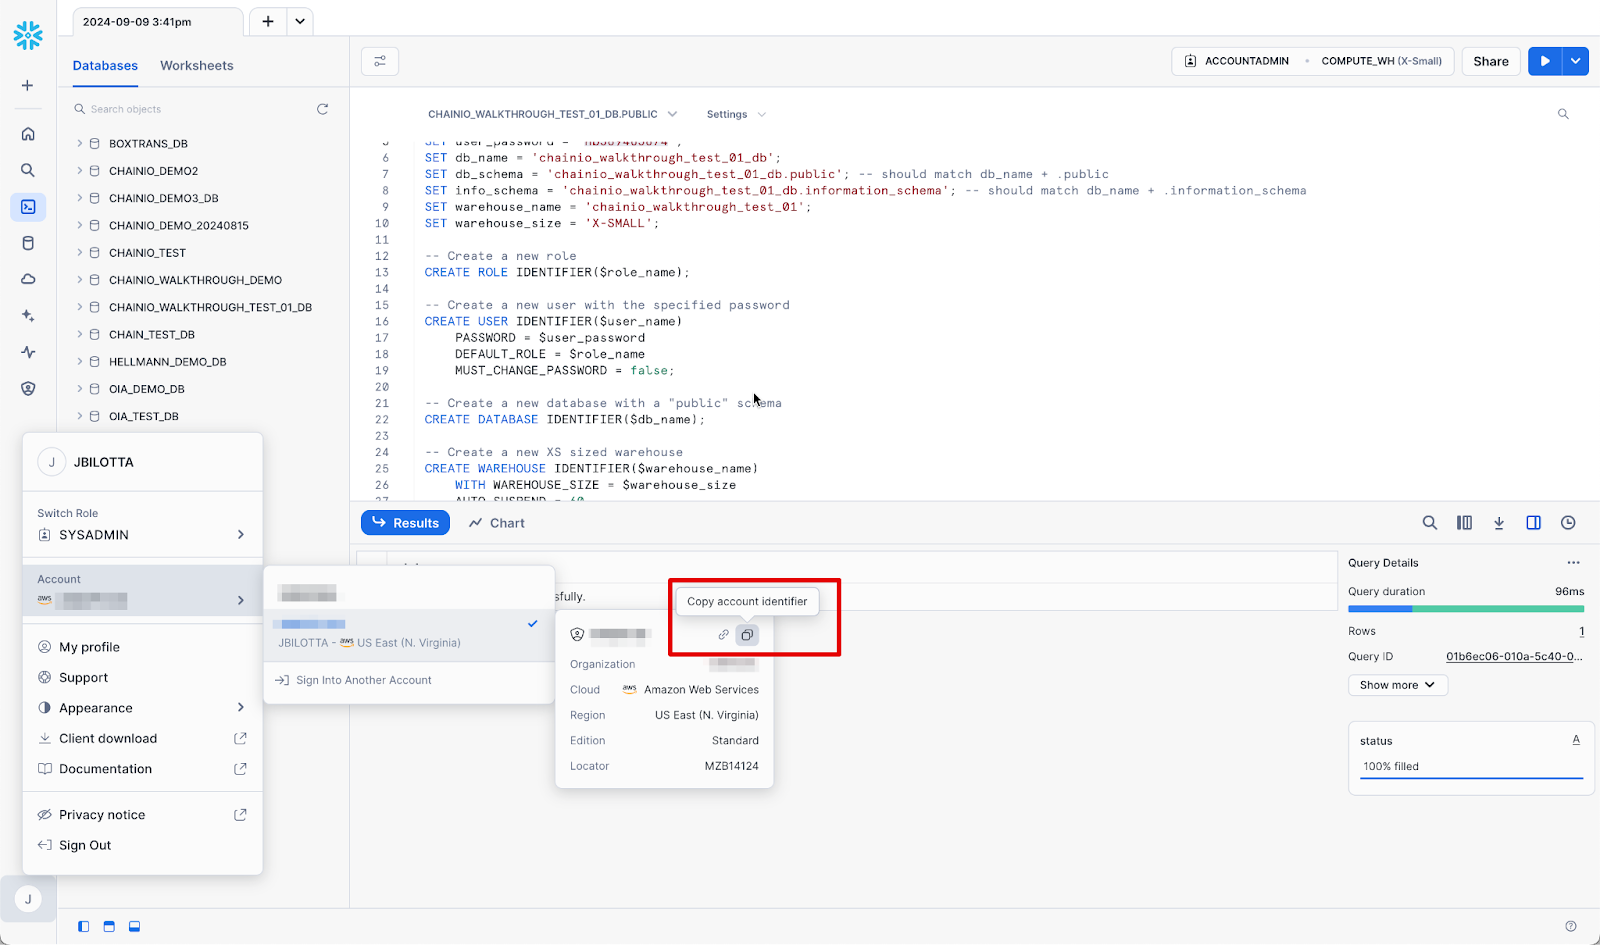
Account
This is the account identifier found in your Snowflake profile. It can be found in the flyout illustrated below. This can also be found in the URL of your Snowflake account as the trailing numbers immediately following the ".com": https://app.snowflake.com/<organization_name>/<account_name>/*
Note: The format of this field on the Add Host form must have a dash(-) between the organization name and account name.
Role
The role_name value for your Snowflake database as it appears in line 3 of your Snowflake worksheet.Warehouse
The warehouse_name value for your Snowflake database as it appears in line 9 of your Snowflake worksheet.Database
The db_name value for your Snowflake database as it appears in line 6 of your Snowflake worksheet.-
Table Type
The default value is Standard; however, there is an option to use hybrid tables which are optimized for low latency/high throughput. Refer to Snowflake's hybrid tables documentation for more information.
Refer to the following documentation for additional information:Snowflake's Hybrid Tables documentation
Chain.io's Snowflake Hybrid Tables support article
Schema
This by default needs to be public and corresponds to the info_schema suffix on Line 7 of your Snowflake worksheet.Canonical Version - This is the version number of the Canonical model being used with this Snowflake system. For more information about Canonical versions, refer to the Canonical Schema. Leave this field set to the default value unless you have a reason the change it.
Private Key - This authentication element is used for Chain.io to establish a connection with Snowflake. This can be generated using the Generate Keys button, or you may use your own 2048-bit RSA key pair encoded in Privacy Enhanced Mail (PEM) format.
Note: If this is a host system that uses the same Snowflake database as another Host System or Integration Connection, make sure to use the same private and public key as the previous configuration. A Snowflake user can only be associated with a single key-pair.Public Key - This authentication element will need to be added to the Snowflake user details to establish a connection between Chain.io and Snowflake. This is the associated public key for the private key above and can be generated using the blue Generate Keys button, or you may use your own 2048-bit RSA key pair encoded in Privacy Enhanced Mail (PEM) format.
Note: If this is a host system that uses the same Snowflake database as another Host System or Integration Connection, make sure to use the same private and public key as the previous configuration. A Snowflake user can only be associated with a single key-pair.
-
Name
After generating the keys, return to the Snowflake application.
Create a new worksheet like the one above.
-
Use the following script in the new worksheet. In the new sheet, replace the <user_name> with the user_name from above.
Example
On the worksheet:ALTER USER <user_name> SET RSA_PUBLIC_KEY = '<public_key>';
Replace <user_name> with:chainio_walkthrough_demo_01
-
Replace the <public_key> with the text from the public key field between the -----BEGIN PUBLIC KEY----- and the -----END PUBLIC KEY----- text.
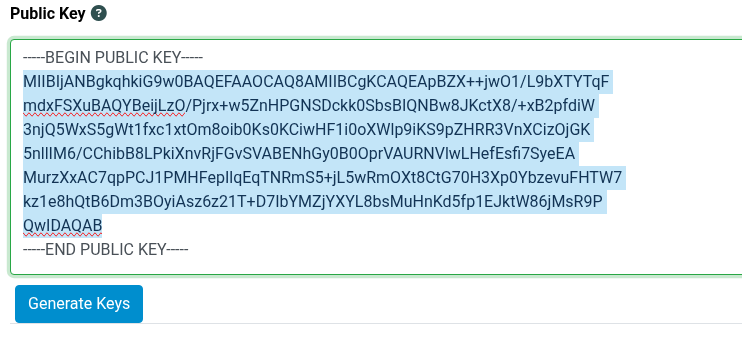
ExampleThe code edits produce a result similar to the following:

Select all of the content of the main script panel(Ctrl+A(Win), Cmd+A(Mac)).
Click the blue Play button in the upper right of the page to execute the script.
- Return to the Chain.io platform window and click the blue Save button.
Initializing the Database Connection for the Host System
Follow the steps below to initialize the database to connect your Snowflake database to your Chain.io platform account.
On the Host Systems page, click the new Snowflake host system subsection banner to expand.
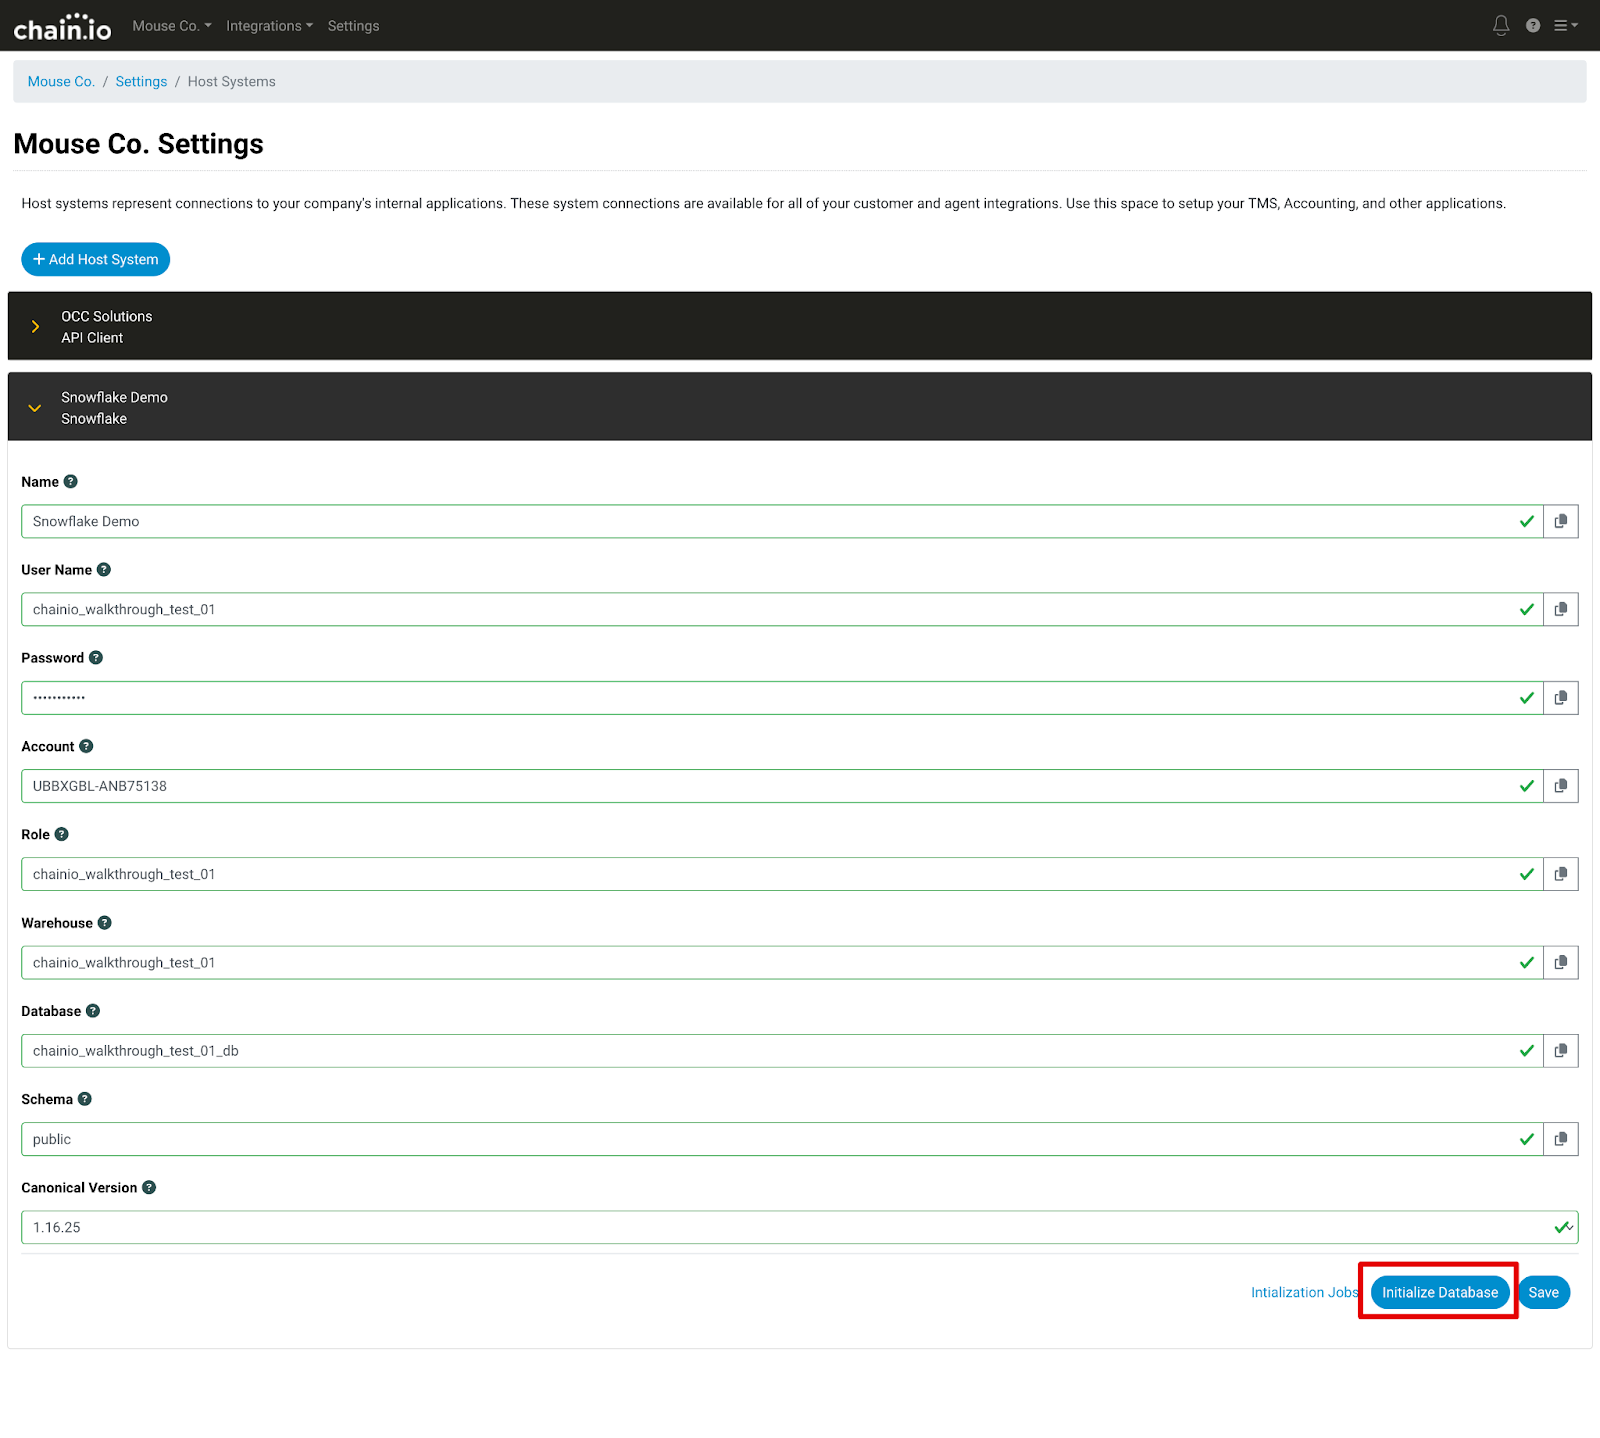
- Scroll down to the bottom of the page.
- Click the blue Initialize Database button.
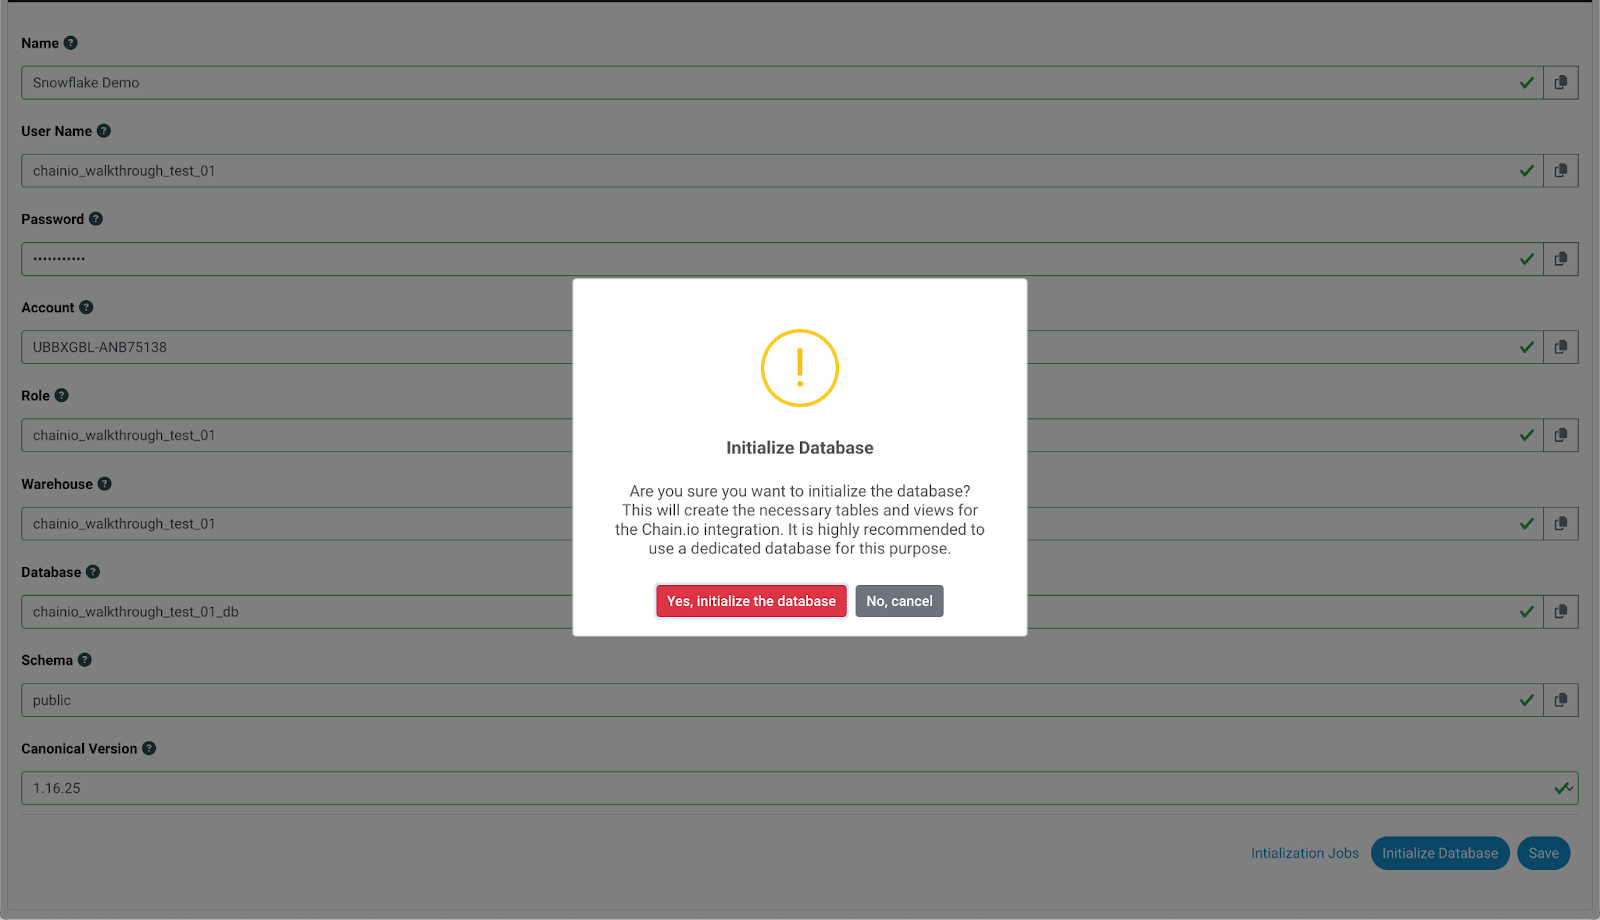
- Within the Initialize Database pop-up window, click the red "Yes, initialize the database" button to confirm the initialization.
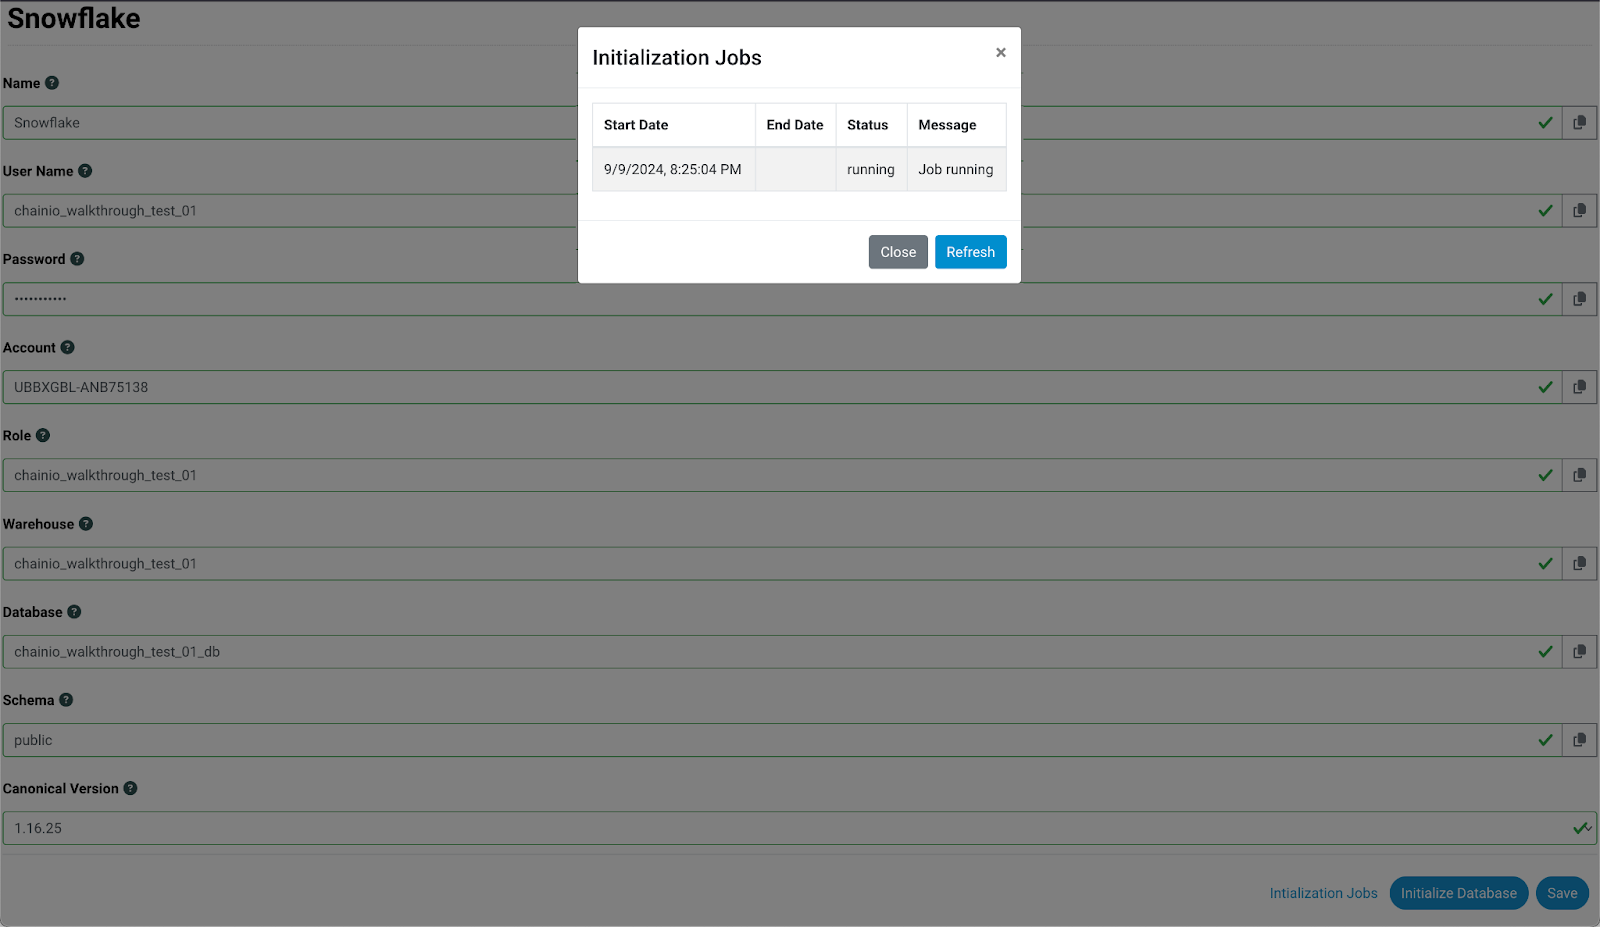
- To check the status of the initialization, click the blue "Initialization Jobs" text at the bottom of the page.

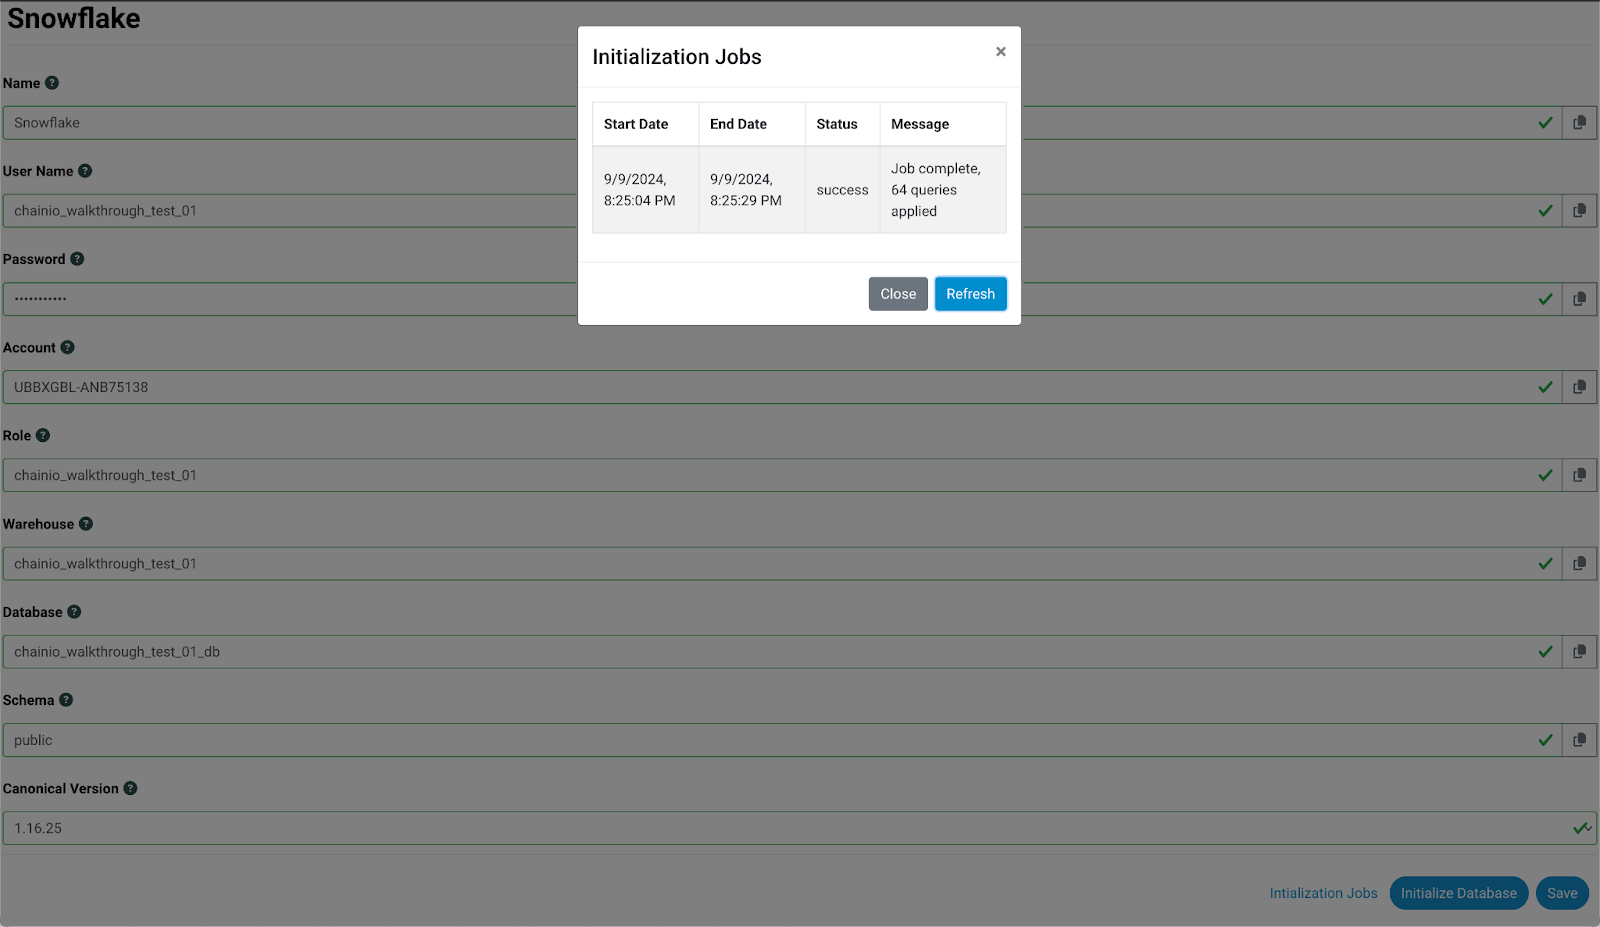
A Initialization Jobs pop-up window will appear with the start date and time of your initialization, the status, and any messages related to the initialization.
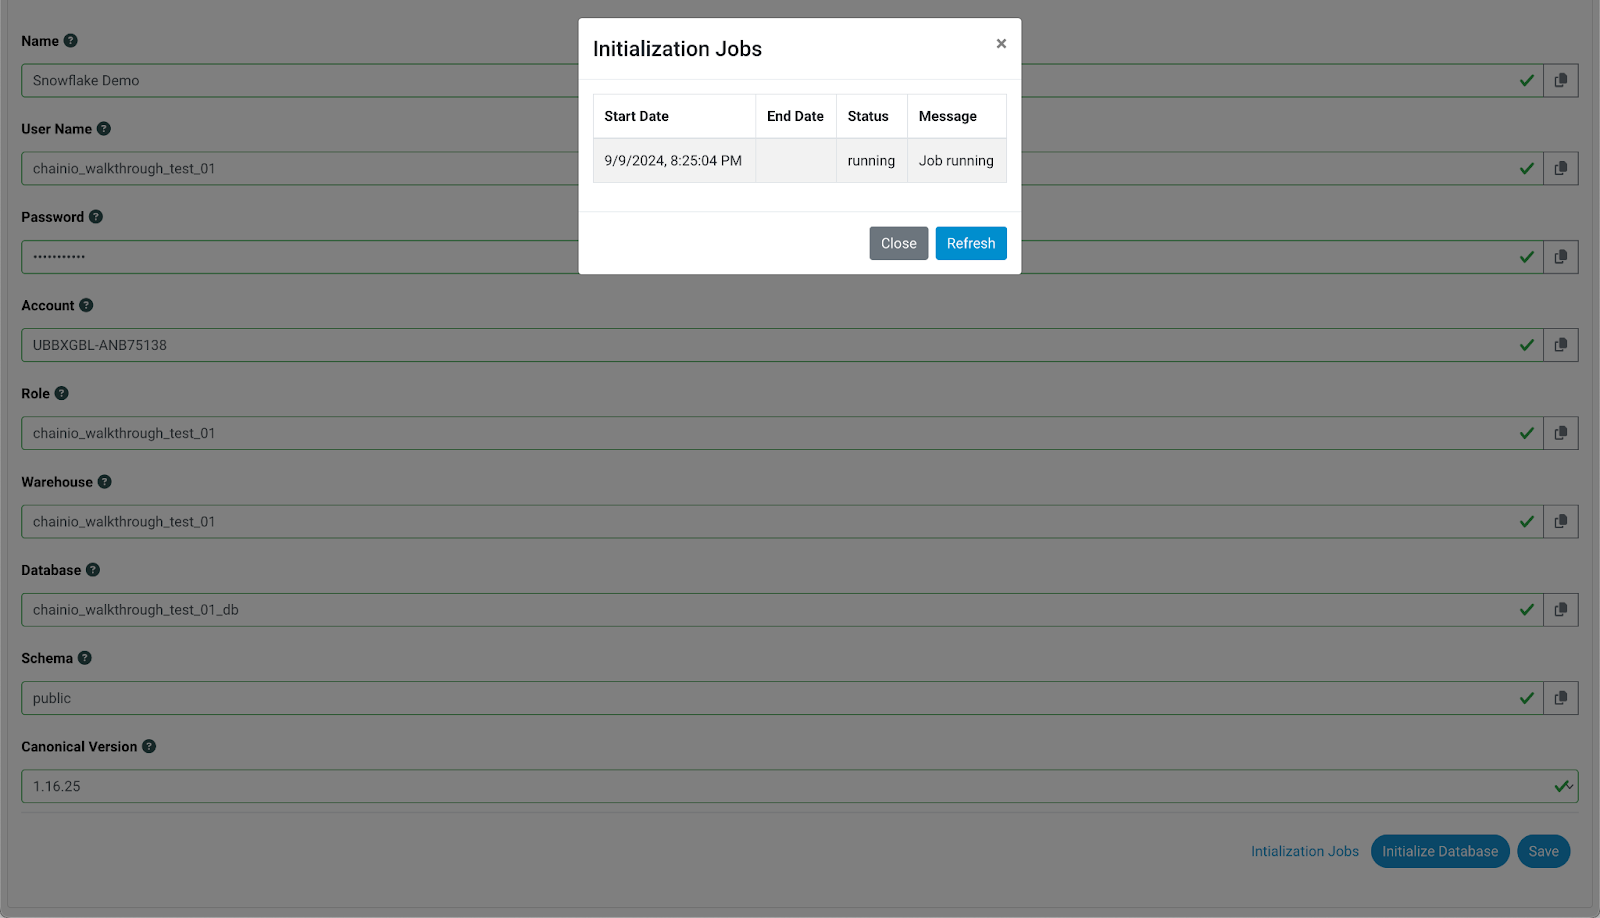
Note: Initialization may take a few seconds and you may have to click the blue Refresh button a few times to see the initialization message change.
When the database connection has been successfully initialized, the Initialization Jobs pop-up window will display a "success" status and the message will read "Job complete, # queries applied."

- Close the pop-up window.
- Click the blue Save button at the bottom of the Snowflake Integration Settings page.
- Return to your Snowflake account.
- Within the menu bar on the left, click the name of the database to confirm the Snowflake and Chain.io linkage.
- You now have a Snowflake Integration Connection ready for use within your Integrations and Flows on the Chain.io platform.
Adding a Snowflake Integration Connection
The second method of connecting a Snowflake database to the Chain.io platform is by adding an Integration connection.
- Navigate to the Chain.io platform.
- At the top menu bar, click Integrations and select the desired Integration where you will add your Snowflake connection.
- At the top right of the window, click Integration Settings from the hamburger menu.
- Navigate to the Connections subsection and click the blue New button.
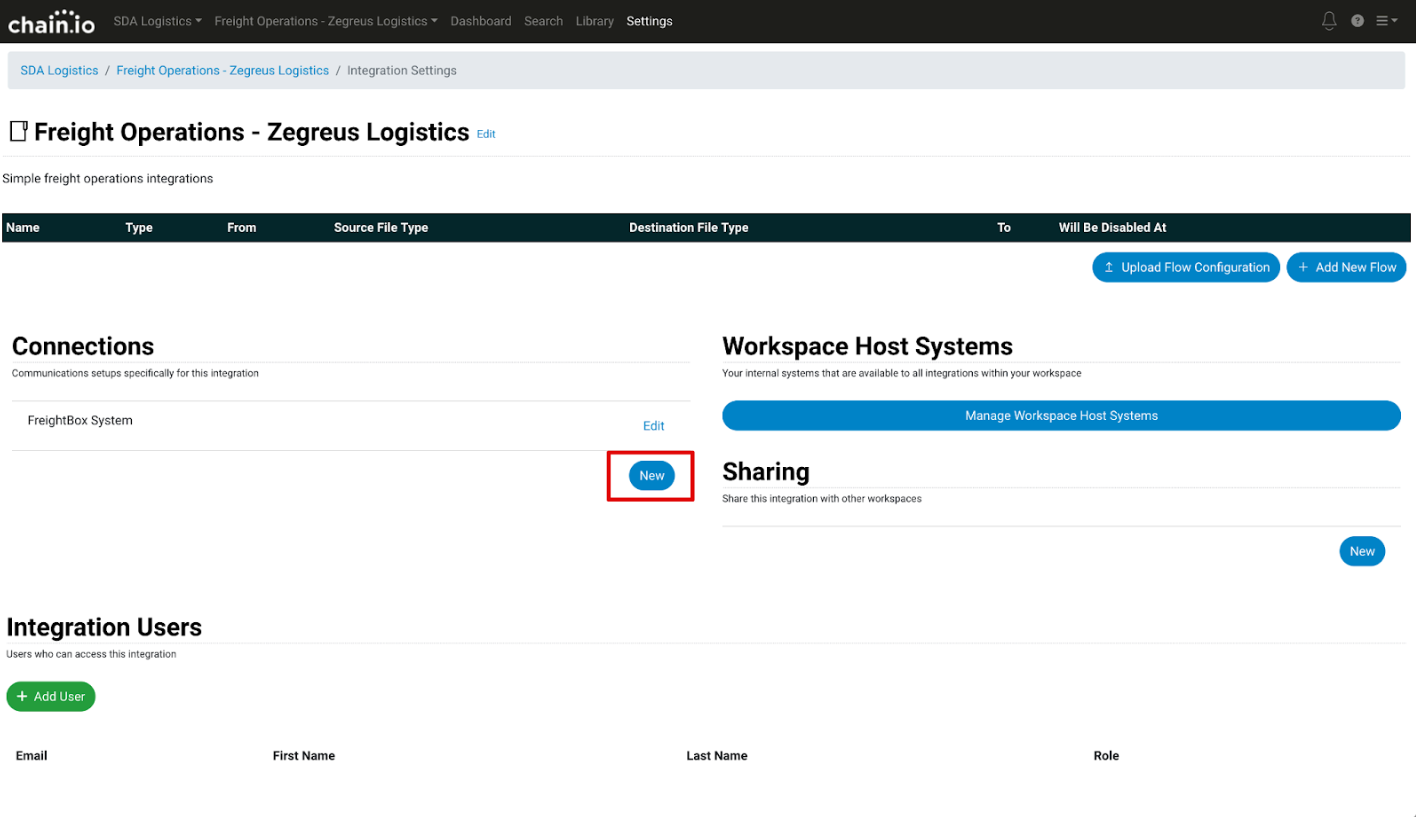
- On the New Connection page, click the Connection Type drop-down menu and select Snowflake from the "Send Data From Host System" section.
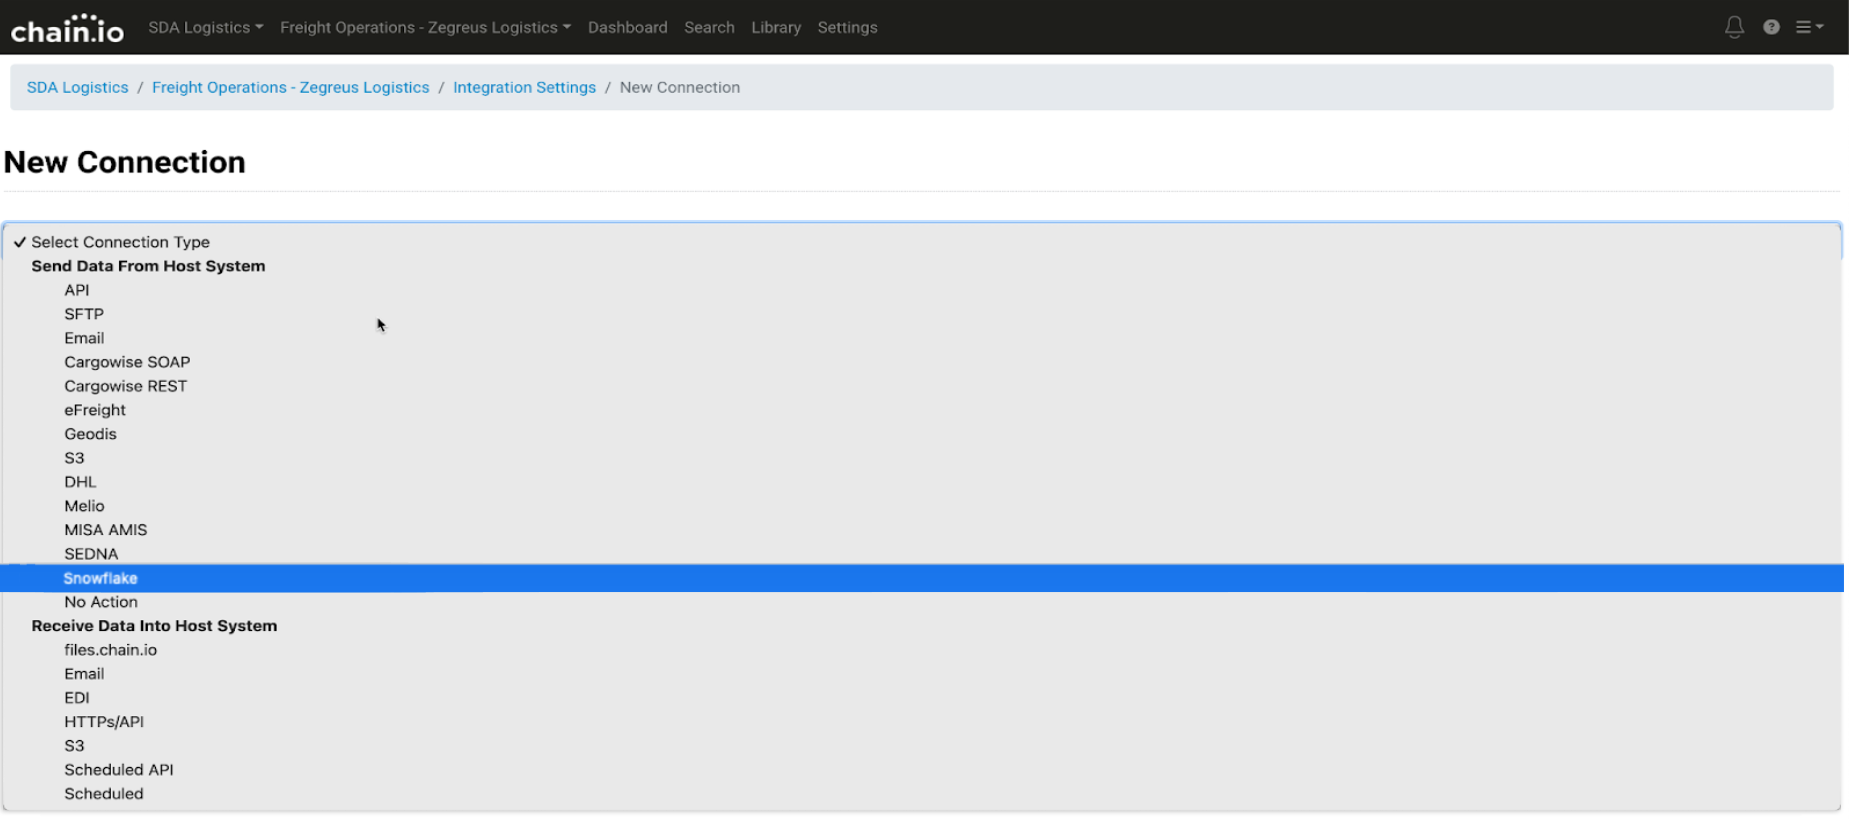
The New Connection form appears.
- Copy and paste the equivalent values from your Snowflake worksheet into the fields. Use the Snowflake Worksheet Variable Diagram presented earlier in the article for reference.
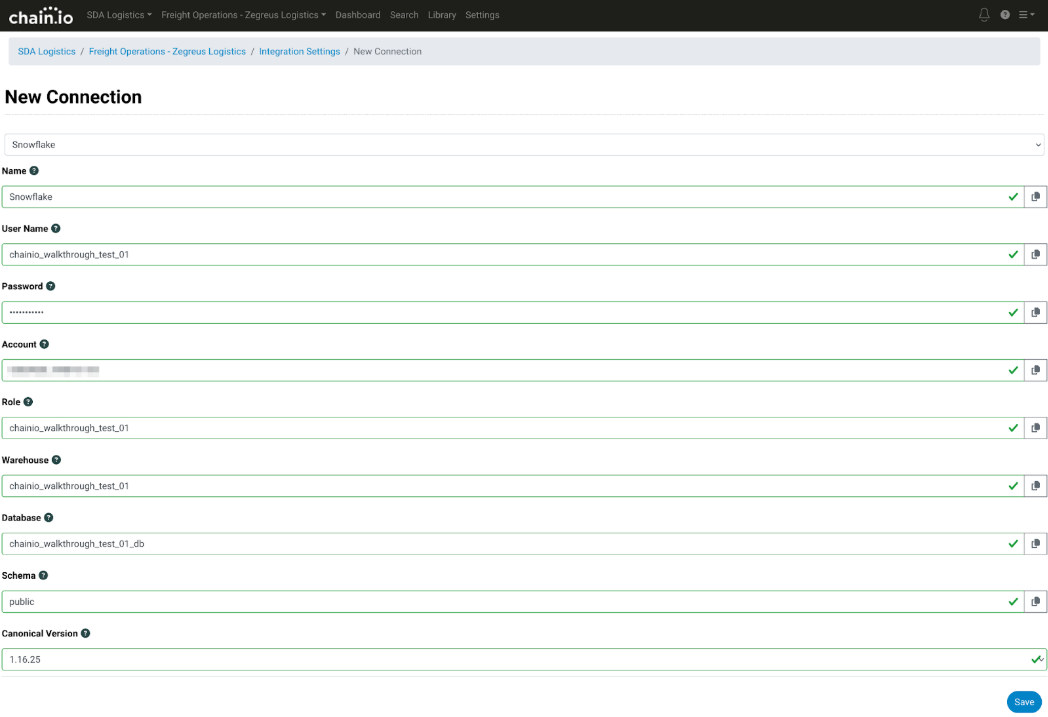
-
Scroll down to the bottom of the page and click the blue Save button.
Initializing the Database Connection for the Integration
The final step to complete the connection between Snowflake and Chain.io is to initialize the database.
- On the Integration settings page, navigate to the Connections section.
- Click the blue Edit text next to the Snowflake connection.
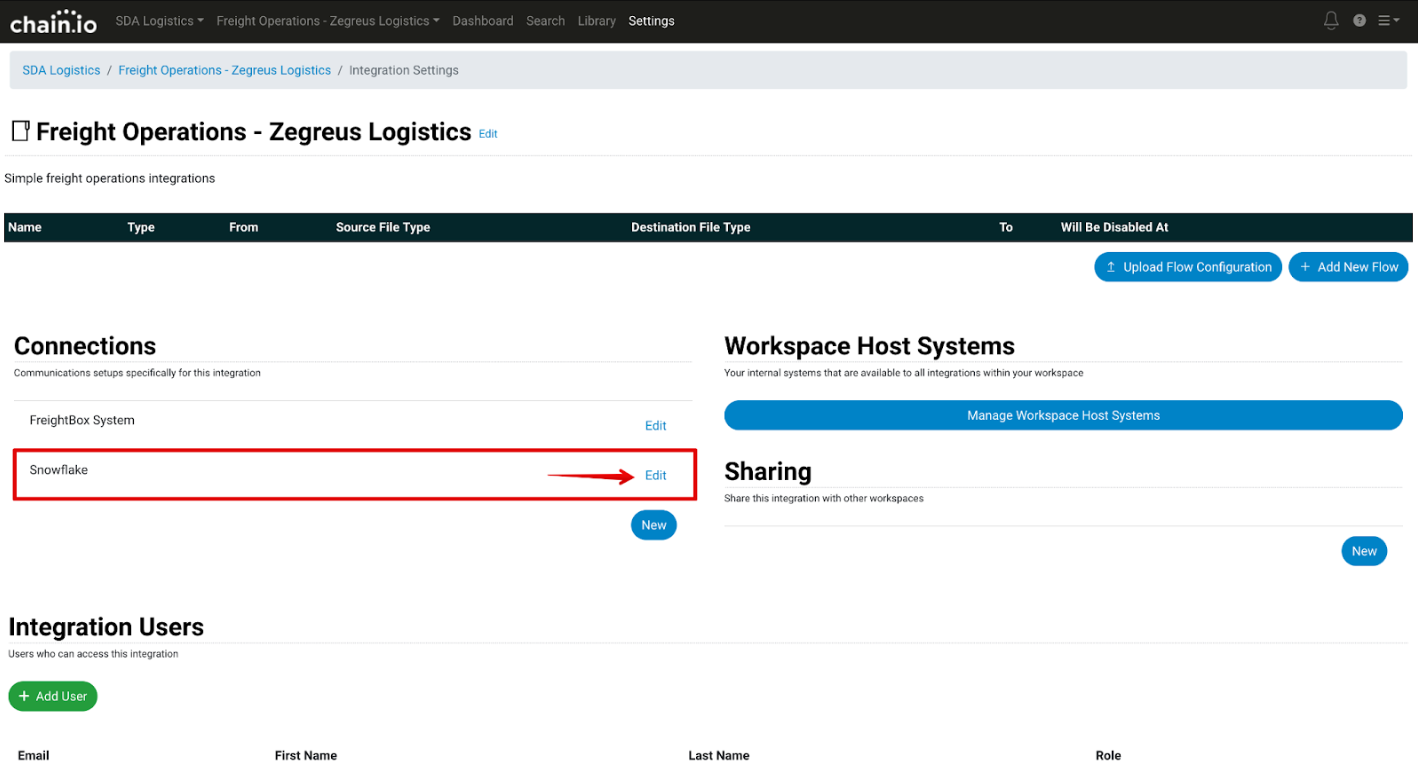
The page refreshes to display the Snowflake Integration connections settings page.
- Scroll down to the bottom of the page and click the blue Initialize Database button.
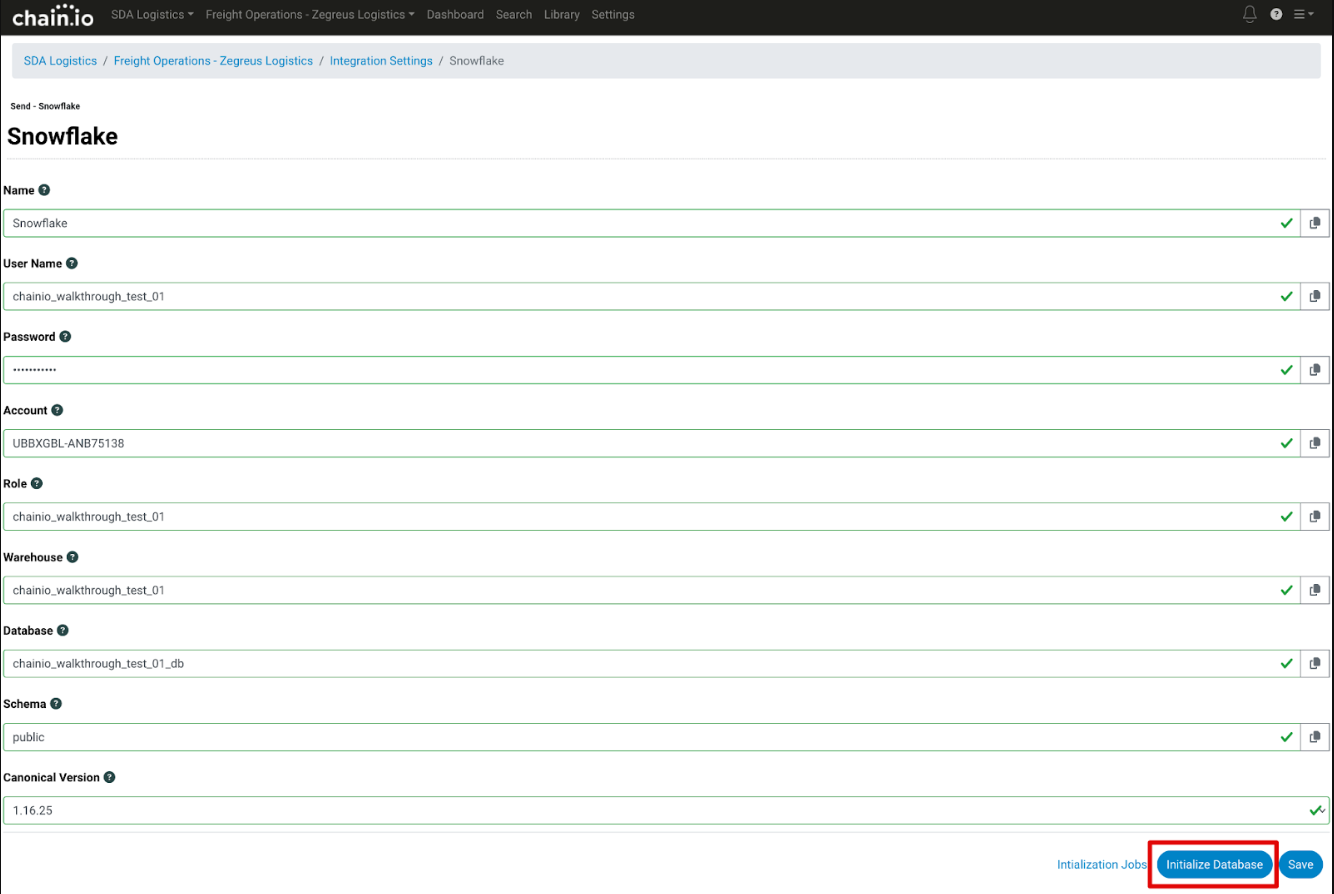
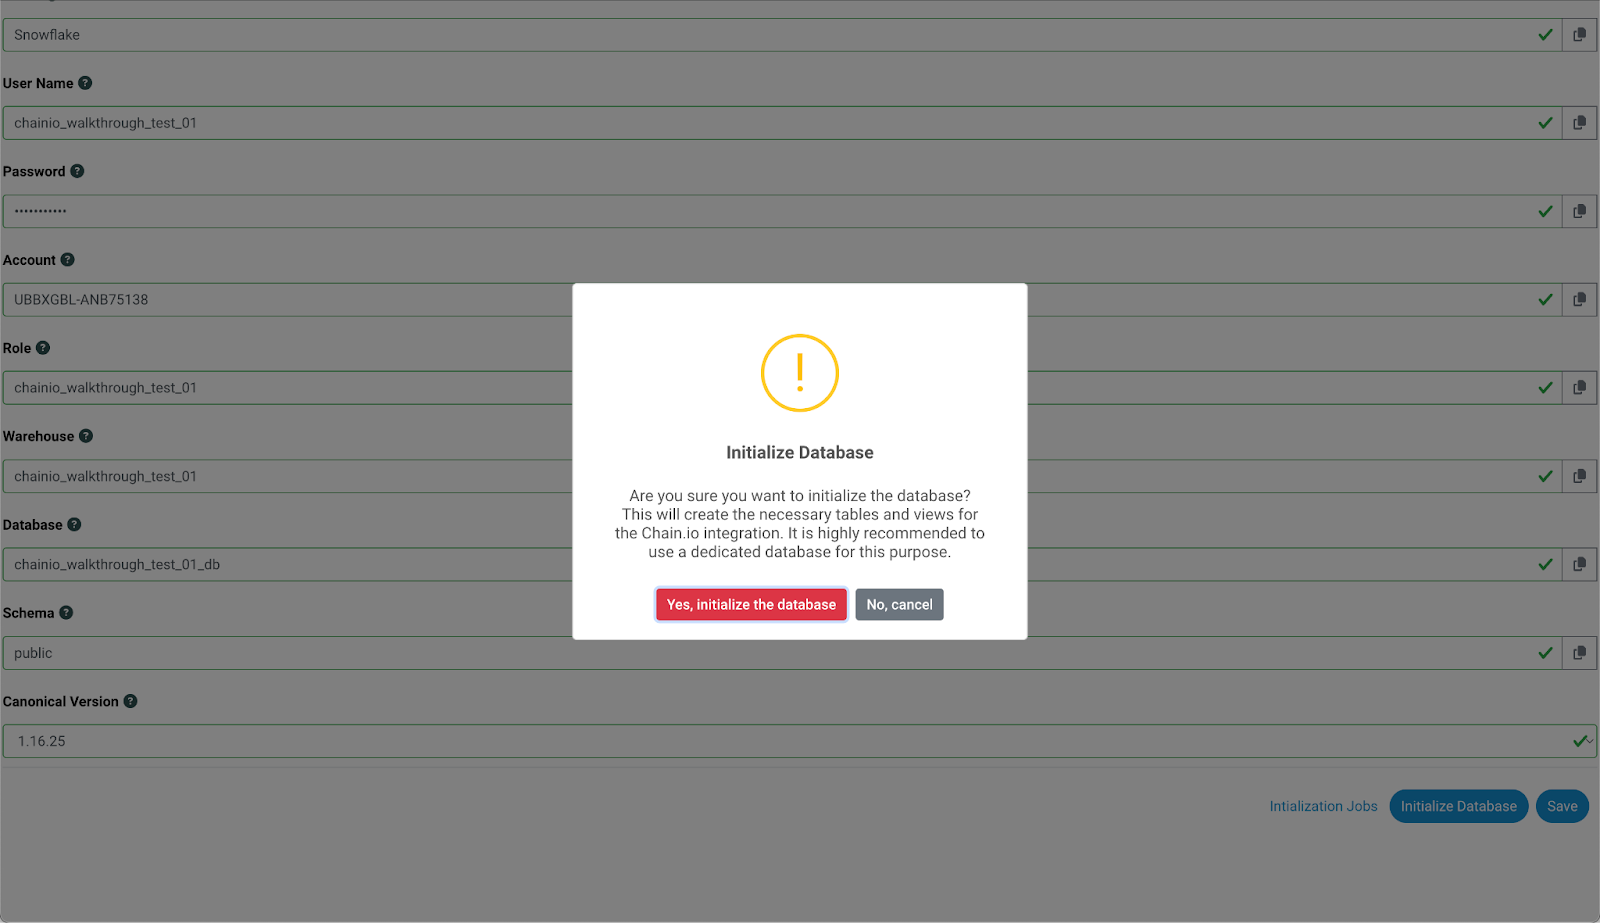
An Initialize Database pop-up window appears.
- Click the red "Yes, initialize the database" button.
- To check the status of the initialization, click the blue "Initialization Jobs" text at the bottom of the page.
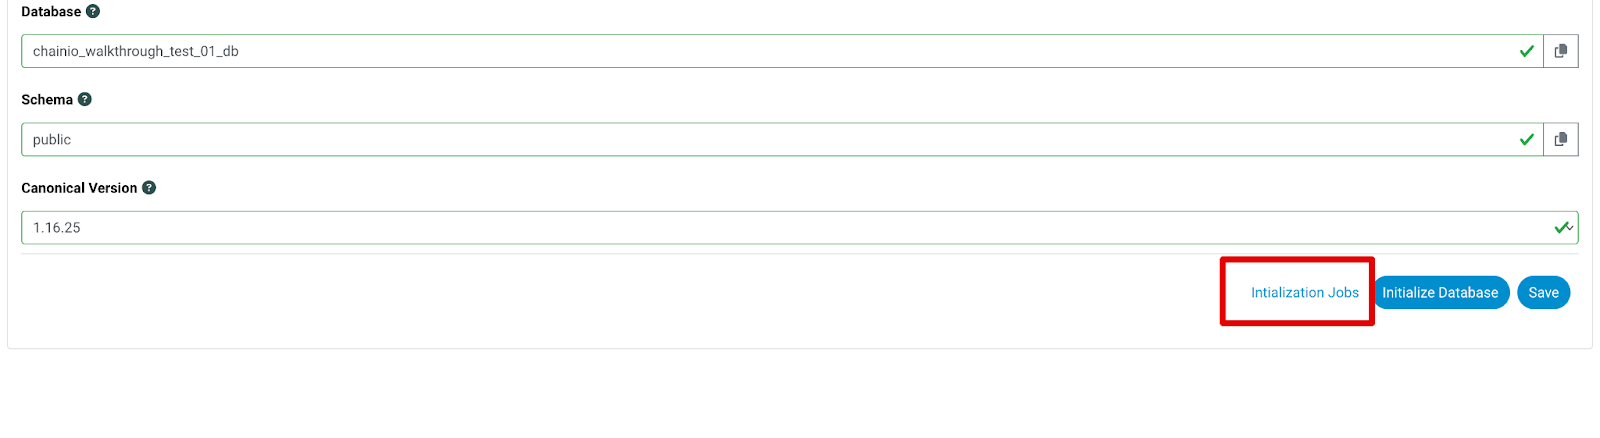
A Initialization Jobs pop-up window will appear with the start date and time of your initialization, the status, and any messages related to the initialization.
Note: Initialization may take a few seconds and you may have to click the blue Refresh button a few times to see the initialization message change.
When the database connection has been successfully initialized, the Initialization Jobs pop-up window will display a "success" status and the message will read "Job complete, # queries applied."
- Close the pop-up window.
- Click the blue Save button at the bottom of the Snowflake Integration Settings page.
- Return to your Snowflake account.
- Within the menu bar on the left, click the name of the database to confirm the Snowflake and Chain.io linkage.
You now have a Snowflake Integration Connection ready for use within your Integrations and Flows on the Chain.io platform.
Adding a Snowflake Host System or Integration Connection to a Flow
To add your Snowflake related Host System or Integration Connection to your Flow Configuration, navigate to the Chain.io platform.
- At the top menu bar, click Integrations and select the desired Integration.
- Start a new Flow or navigate to an existing Flow Configuration.
- At the top right of the screen, click Integration Settings from the hamburger menu.
- Within the list of Flows, click Edit to the right of the desired Flow or create a new Flow.
An existing Flow is used for this example. For additional information on how to create a Flow, refer to the Creating a Basic Flow support article. - On the Flow configuration settings page, scroll down to the Destination File Type banner to expand.
- Click the Select button under the Snowflake Canonical option.
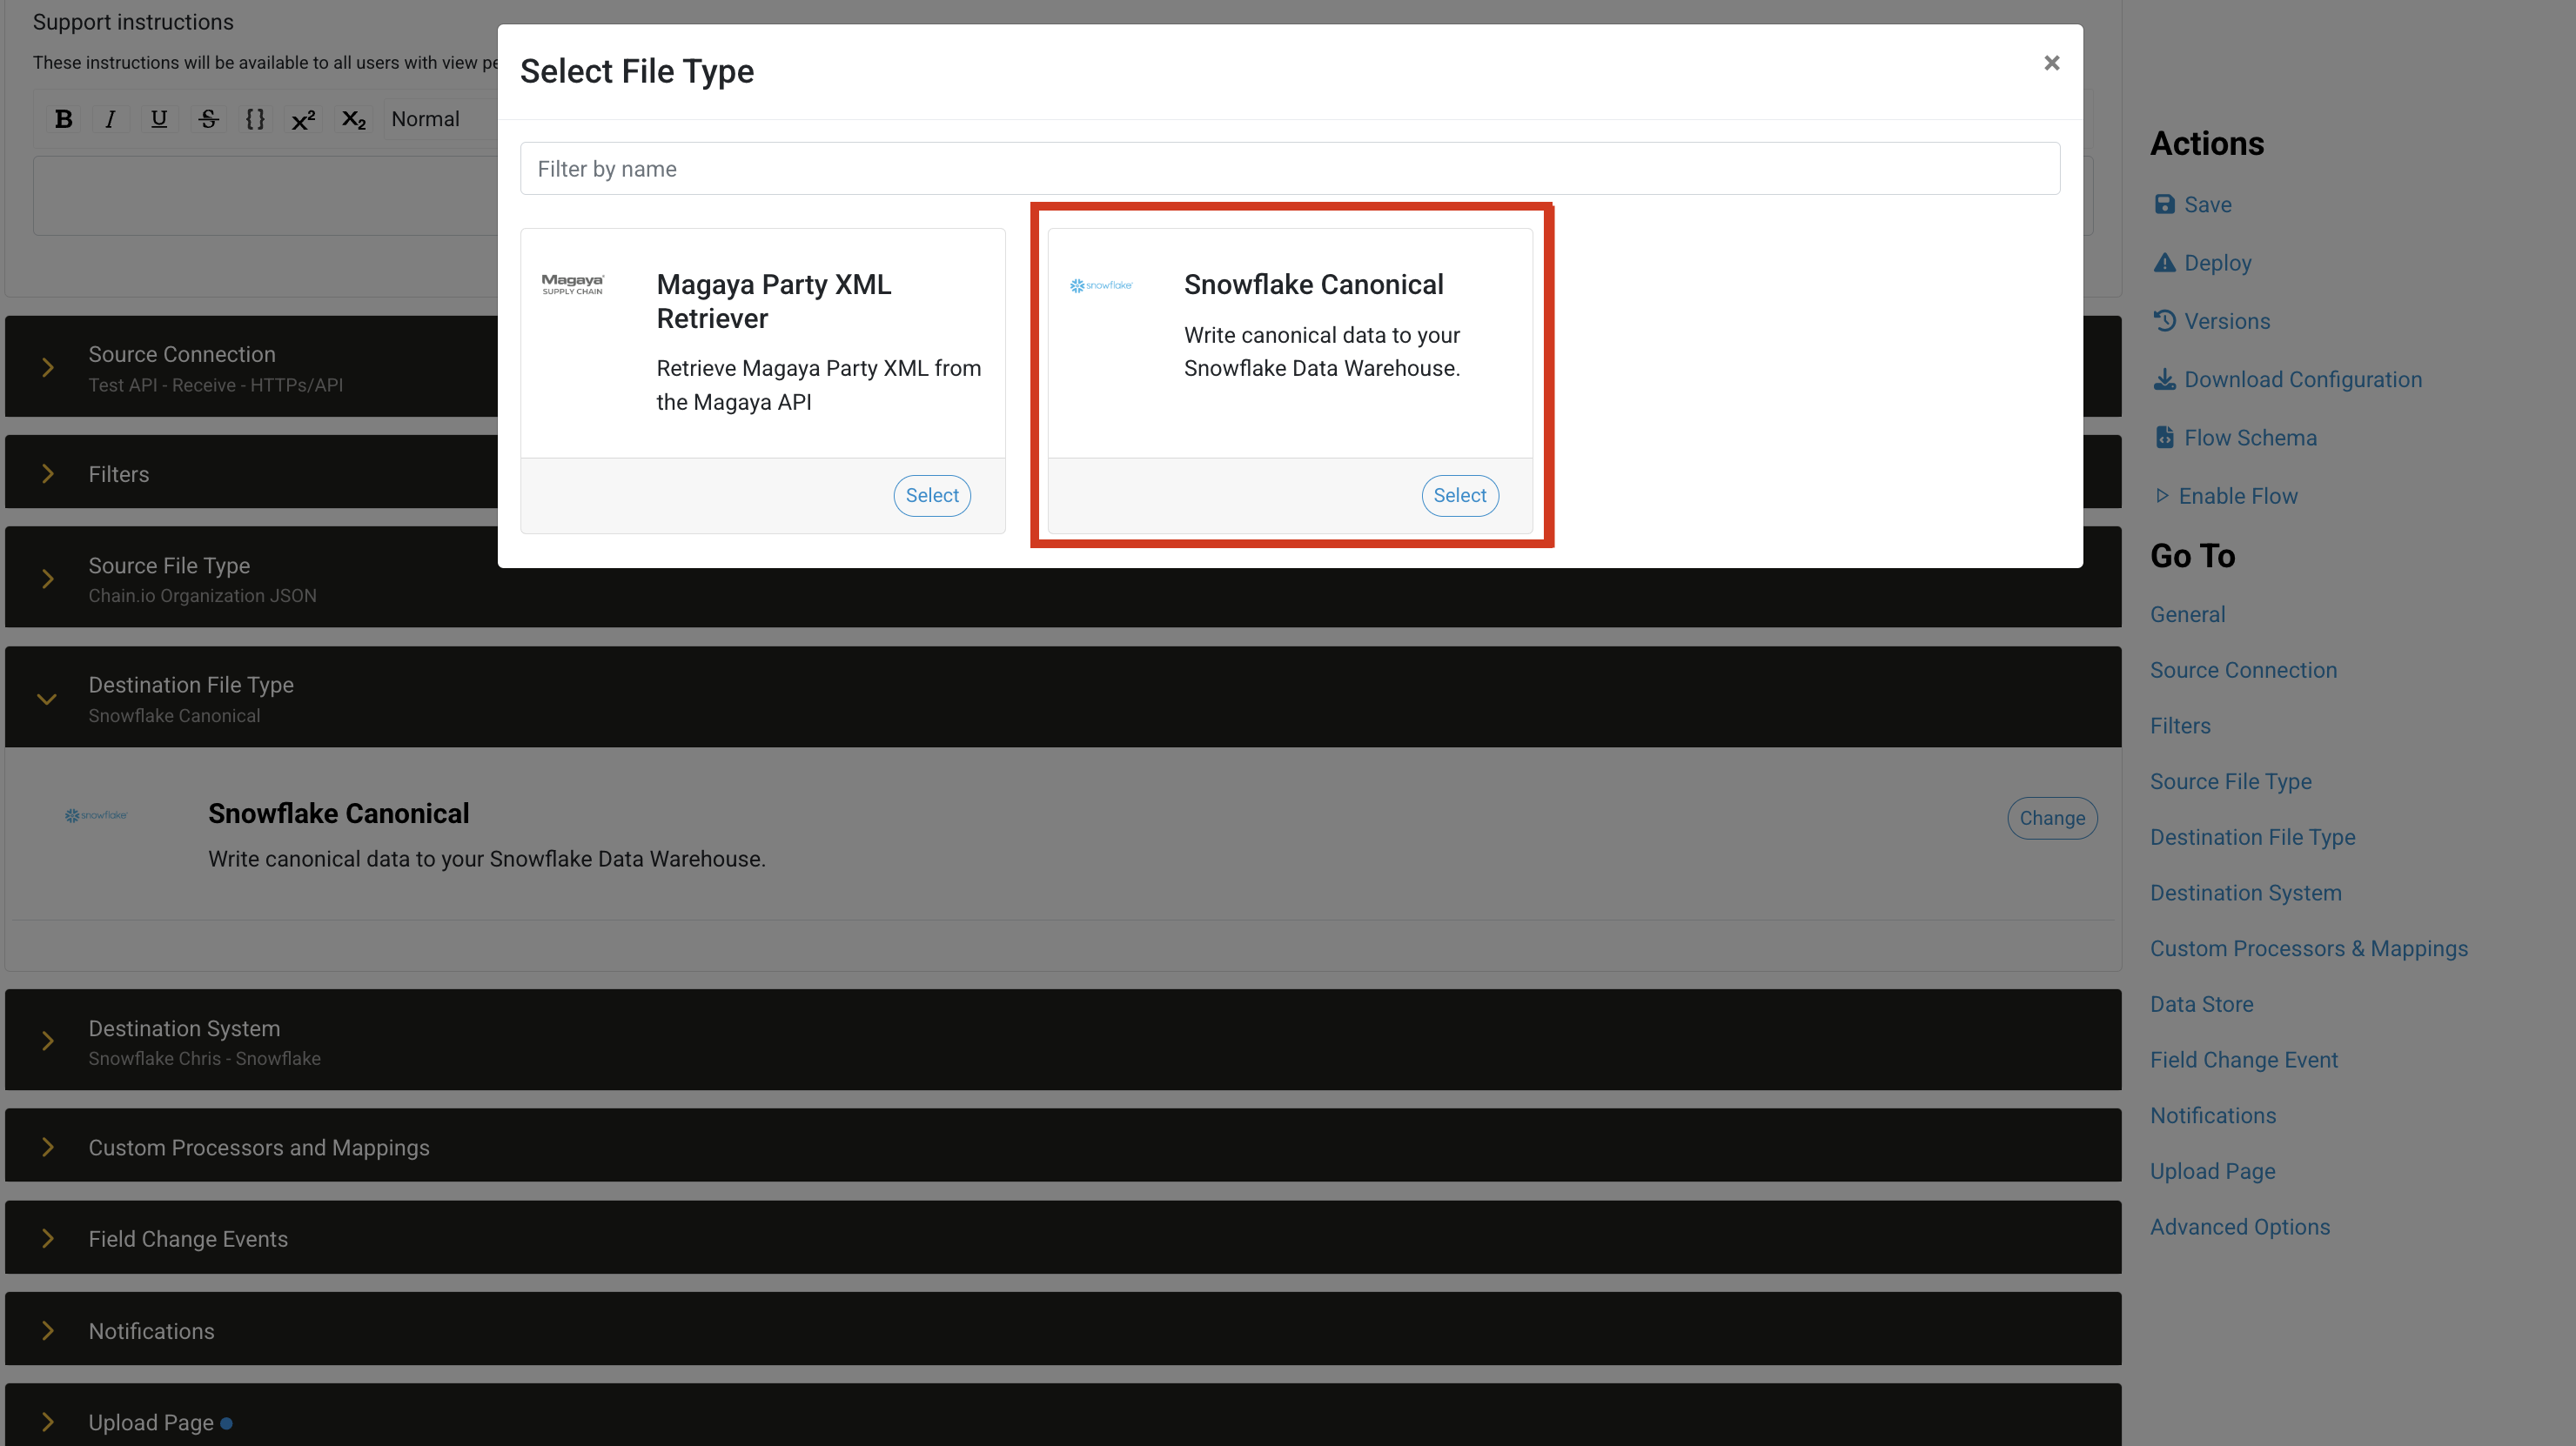
The system shows Snowflake Canonical selected as destination file type.
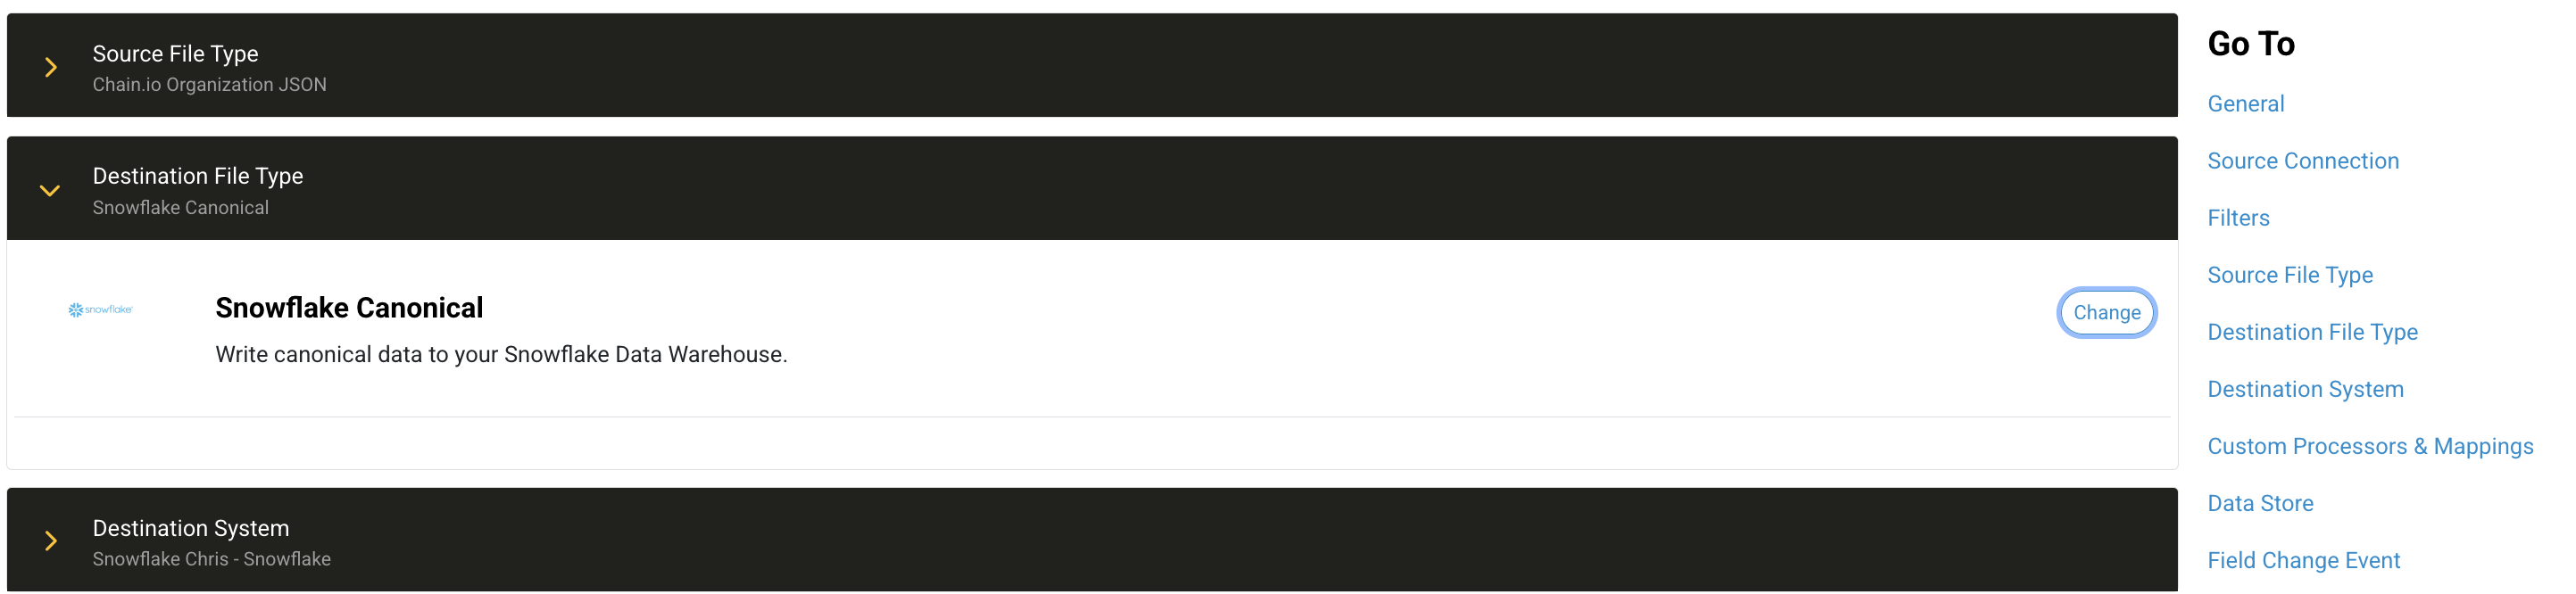
- Scroll down to the Destination System subsection and click to expand.
- Select the Snowflake system that was created in the previous steps.

The system shows the Snowflake system selected as the Destination System.

- Complete any additional Flow configuration settings required for your use case.
-
Within the menu bar on the right side of the page, click Save, and then click Deploy to confirm the Flow configuration settings.
Migrating to Key-Pair Authentication
To migrate to key-pair authentication, select the existing host system or Integration connection to edit the configuration settings.
Enter the key pair.
You can either generate the key pair with a host system or Integration connection, or use your own 2048-bit RSA key pair encoded in Privacy Enhanced Mail (PEM) format.
Note: Use the same private and public key for each system or connection that uses the same Snowflake database.After generating and en the keys, return to the Snowflake application.
Create a new worksheet like the one above.
-
Use the following script in the new worksheet. In the new sheet, replace the <user_name> with the user_name from above.
Example
On the worksheet:ALTER USER <user_name> SET RSA_PUBLIC_KEY = '<public_key>';
Replace <user_name> with:chainio_walkthrough_demo_01
-
Replace the <public_key> with the text from the public key field between the -----BEGIN PUBLIC KEY----- and the -----END PUBLIC KEY----- text.
ExampleThe code edits produce a result similar to the following:
Select all of the content of the main script panel(Ctrl+A(Win), Cmd+A(Mac)).
Click the blue Play button in the upper right of the page to execute the script.
- Return to the Chain.io platform window and click the blue Save button to confirm the new private and public key.
A warning pop-up message will appear, explaining that the system or connection has been updated and you will need to re-deploy Flow utilizing this host system or Integration connection.
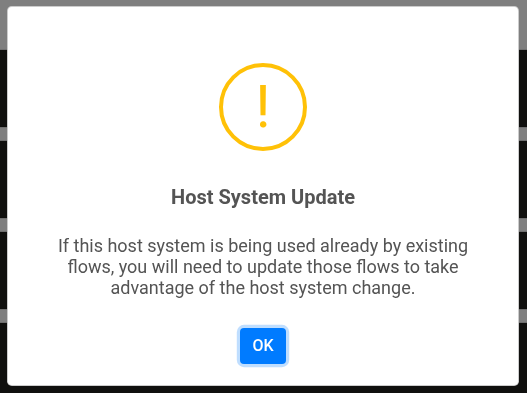
- Redeploy Flows that are utilizing this host system or Integration connection for the changes to take effect.
Was this article helpful?
That’s Great!
Thank you for your feedback
Sorry! We couldn't be helpful
Thank you for your feedback
Feedback sent
We appreciate your effort and will try to fix the article