In this article:
Overview
Hybrid tables allow for a higher throughput of data by pushing data to a queue in Snowflake, and then the queue processes the data. Previously, the Snowflake host system process was only compatible with standard tables. Initializing the database involves selecting a table type, standard or hybrid, to create the tables. Hybrid tables are available for any Send Flow type with Snowflake Canonical selected as the destination File type. You must already have a Snowflake account to use hybrid tables on the Chain.io platform.
For more information about creating hybrid tables within Snowflake, refer to Snowflake’s Hybrid Tables support article.
Data Migration and Switching Table Types
At this time, we do not offer an automatic migration path, and manual configuration is required. For data migration purposes, we recommend creating a new host system and connecting to a Snowflake database.
We recommend not switching between hybrid and standard tables after initializing a database, as this process requires additional manual steps. If you wish to switch table types from hybrid to standard or vice versa after initializing the database, it will require:
- Backing up the data from the table in Snowflake
- Dropping the original table in Snowflake
- Restoring the data in Snowflake
- Re-initializing the database in the Chain.io platform
-
Creating the new hybrid table or standard table in the Chain.io platform
Configuring Hybrid Tables
During the configuration process, it is helpful to maintain 2 open browser tabs:
- Chain.io platform
- Snowflake account
For more information about using Snowflake within the Chain.io platform, refer to the Using Snowflake with Chain.io support article.
To use hybrid tables for Snowflake within the Chain.io portal, first sign in to your Chain.io portal account at https://portal.chain.io/.
Follow the steps below to set up a host system or Integration connection in your Chain.io Workspace to connect your Snowflake database.
- At the top menu bar, click Workspaces and select the Workspace of choice.
- At the top right of the screen, click Workspace Settings from the hamburger menu.
- Navigate to the Flow Setup subsection.
- Click Host Systems.
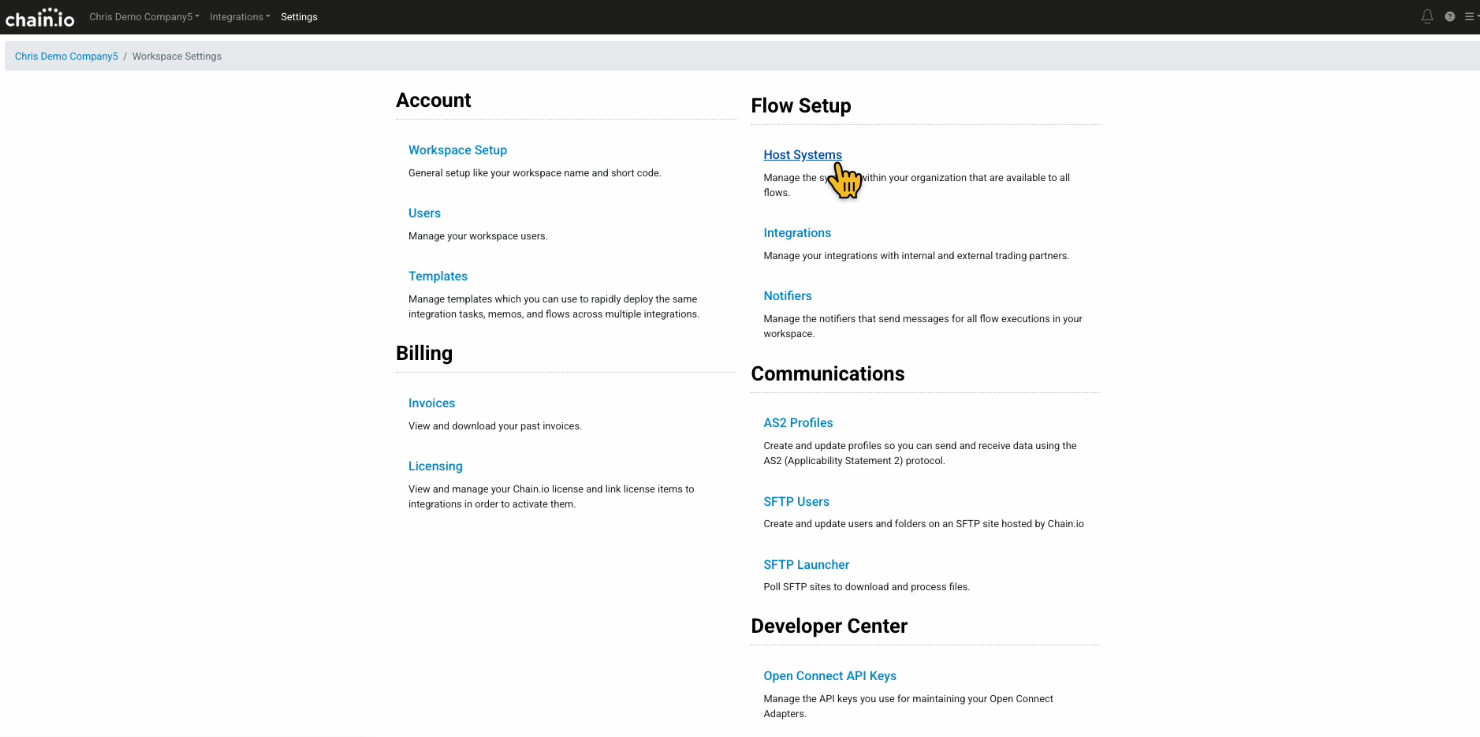
The page refreshes to the Host Systems page with a list of tabs corresponding to configuration settings. If you have established host systems, they will appear on this page.

-
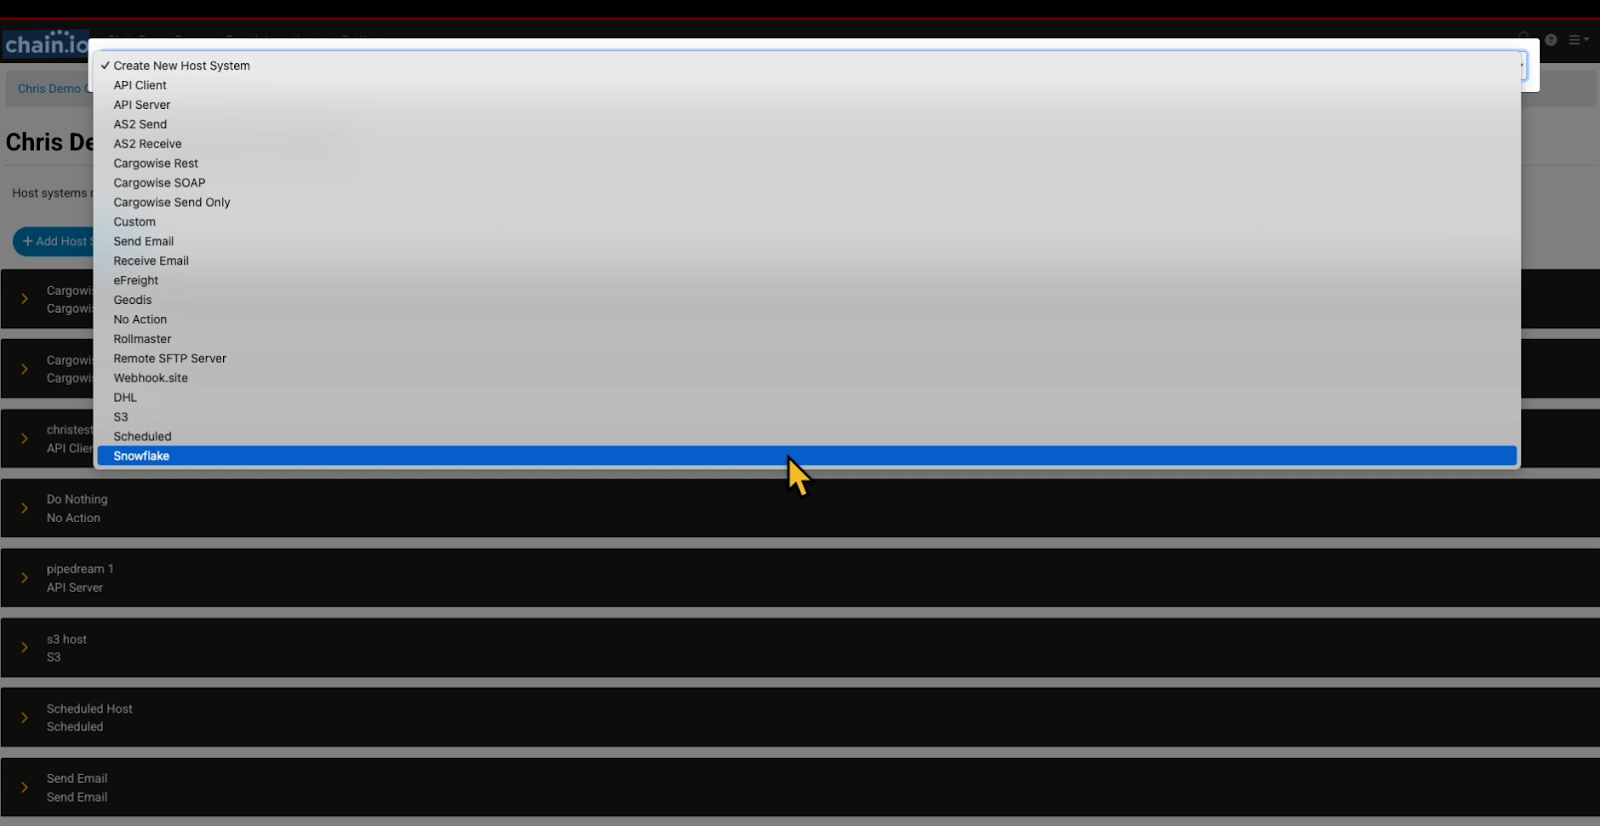
Click the blue Add Host System button at the top of the page to create a new Host System.
A drop-down menu appears with options for types of host systems. - Select Snowflake from the drop-down menu.
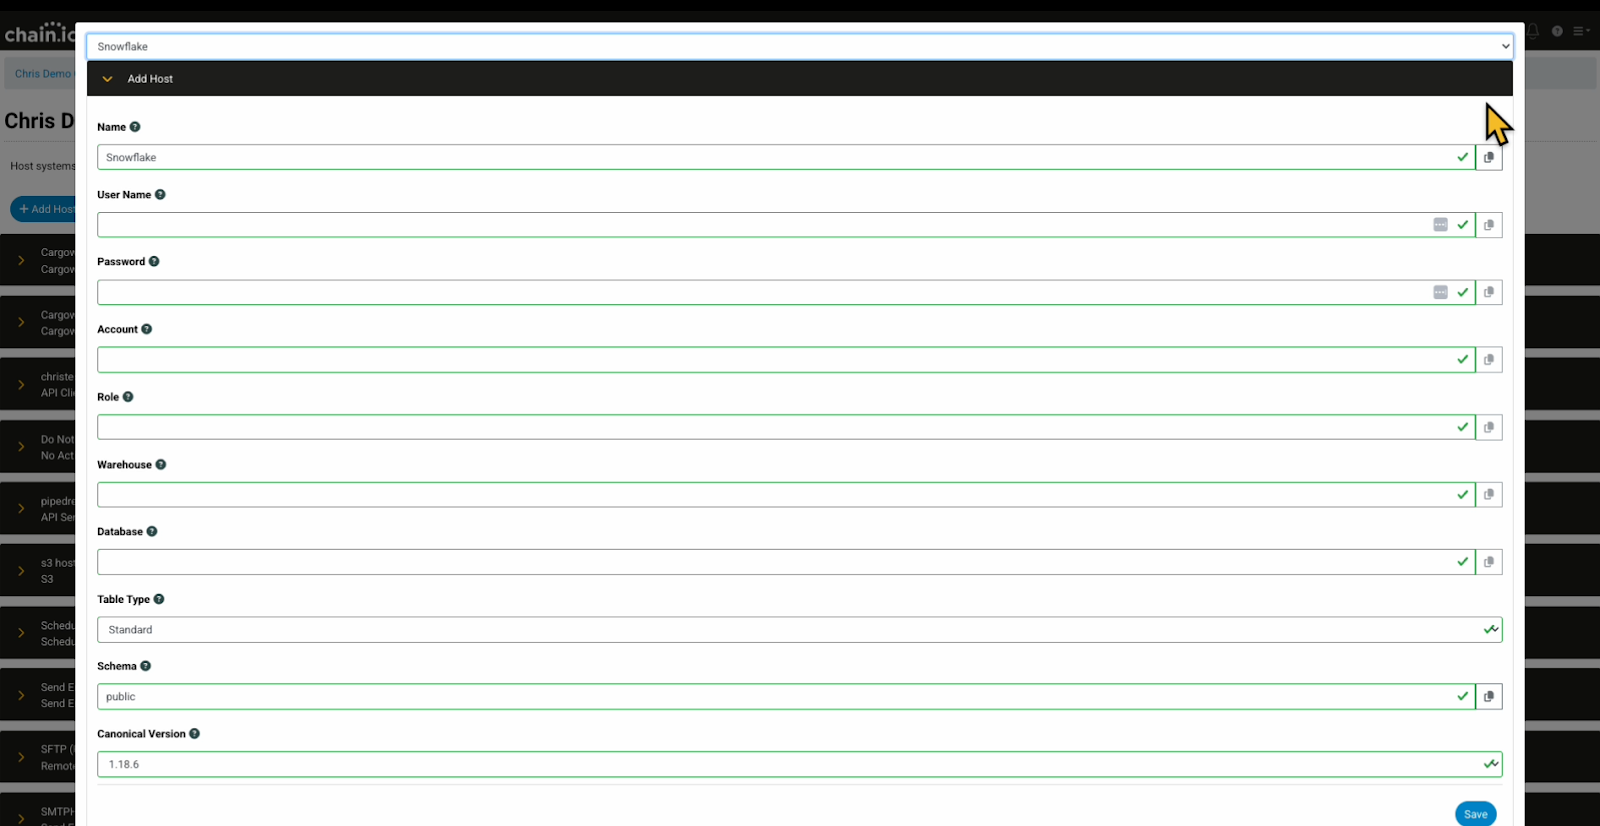
The Ad Host pop-up window appears.
-
Enter the appropriate information for the configuration settings.
Ad Host pop-up window fields are explained below.
Snowflake is already selected from the drop-down list above the red Ad Host banner as the designated platform.
-
Name
This will be the name of your host system. Select a unique and easily identifiable name.
-
User Name
This is your Snowflake account username. This account must have admin privileges. This information can be found in line 4 of your Snowflake worksheet.
-
Password
This password will be used for the Snowflake database. This information can be found in line 5 of your Snowflake worksheet.
-
Account
This is your Snowflake account identifier. This information is located in the flyout that appears when you click your user profile image in the sidebar of your Snowflake account. It should match the following format: <org name><account name>.
-
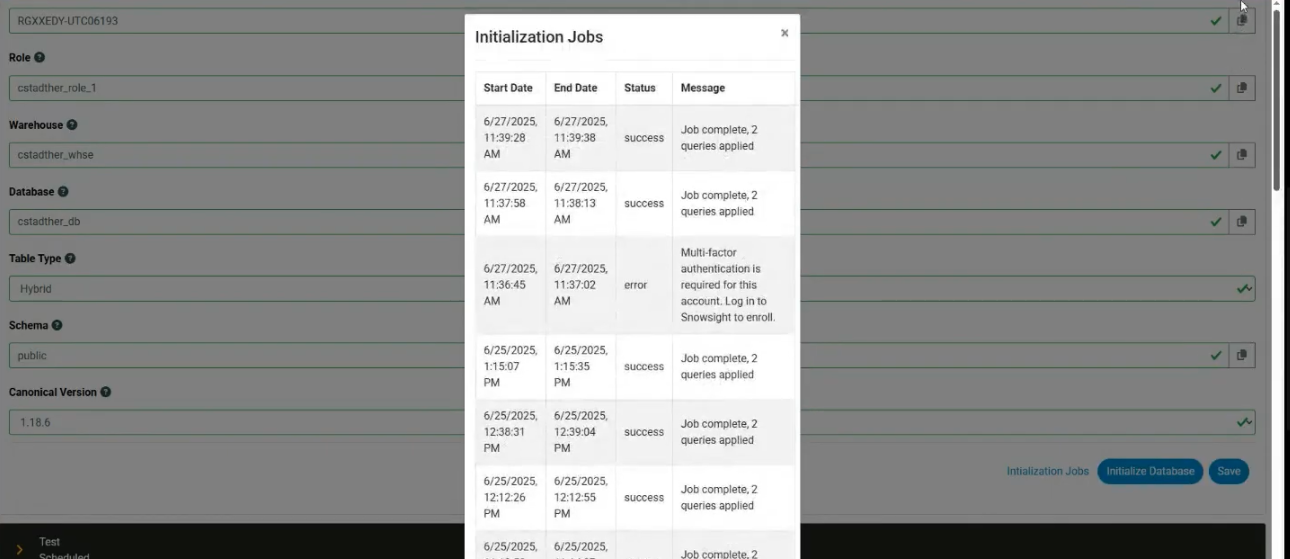
Role
This is your user role within the Snowflake database that should be used to execute the SQL statements when data is fed to the database. This information is found on line 3 of your Snowflake worksheet. If this field is left blank, then the value will not be passed to Snowflake.
-
Warehouse
This is your Snowflake warehouse name that will be used to execute the SQL statements when data is sent to the database in Snowflake. This information can be found on line 9 Snowflake worksheet.
-
Database
The database name where the data will be written in Snowflake. This information can be found on line 6 of your Snowflake worksheet. We recommend using a database that is only utilized by this host system.
-
Table Type
Select between a standard and hybrid table type.- Standard tables: Optimized for handling large queries utilizing a columnar storage method.
- Hybrid tables: Optimized for computing single-row operations at a faster rate than standard tables.
-
Schema
This reflects the information schema used in Snowflake and can be found as the suffix of the value on line 7 of your Snowflake worksheet. The default value is public.
-
Canonical Version
The default value is 1.18.6. Other options are available, but changing the canonical version requires reinitialization of the database. Refer to the Using Snowflake With Chain.io support article for more information.
-
Name
This is an example of a completed Ad Host form.

- In the bottom right corner of the window, click the blue Save button.
- Click the blue Initialize Database button.
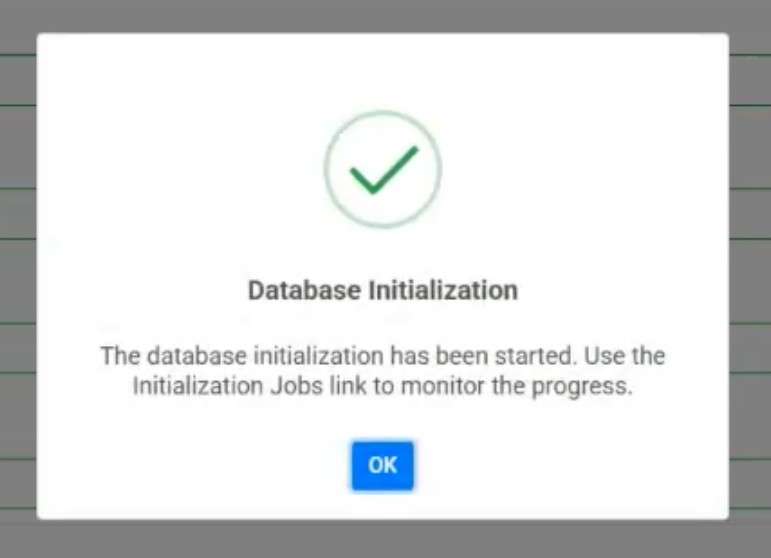
A pop-up window will appear requesting confirmation to initialize the database.
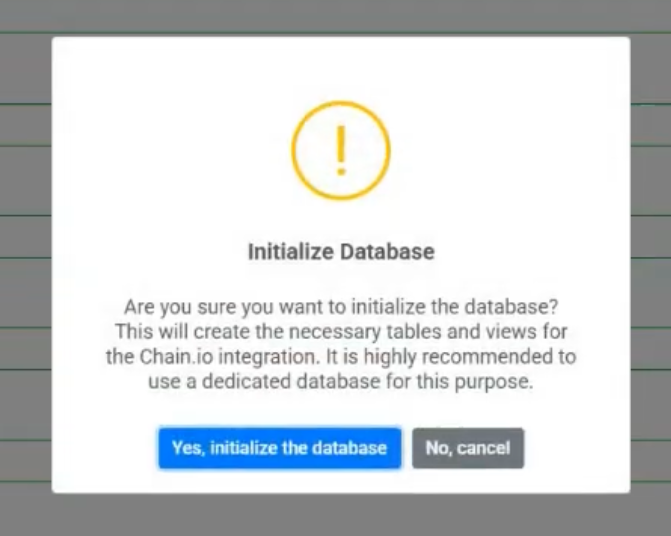
- Click the blue “Yes, initialize the database” button.
-
Click the blue OK button.
Verify Table Creation
- In the lower right corner of the window, click the blue Initialization Jobs text to view the initialization logs for the database.
- Navigate to your Snowflake account.
- Refresh the Snowflake website page.
- On the left side of the page, under the Tables subsection, click the name of the table you recently created in the Chain.io platform.
Here you can verify the table specifications in the table definition region of the page. Each hybrid table has a unique primary key value.

You can navigate to the Chain.io platform to continue with your workflow, now employing Snowflake hybrid tables.
Was this article helpful?
That’s Great!
Thank you for your feedback
Sorry! We couldn't be helpful
Thank you for your feedback
Feedback sent
We appreciate your effort and will try to fix the article