In this article:
- Overview
- Accessing the Custom Mapping Tool
- Creating a New Mapping
- Editing a Mapping
- AI Mapping Assistant
- Adding a Lookup Table
- Versioning and Deployment
- Deleting a Mapping
- Using a Custom Mapping in a Flow
Overview
Chain.io's Custom Mapping Tool turns complex data transformation into a fast, flexible task. Use the Custom Mapping Tool to have more integration flexibility and customization of your data mappings within your Flows. The JSONata Expression panel provides greater control over how data points are handled between uploading an input file and producing a customizable output file. Finally, the vast selection of file output formats offers you the opportunity to instantaneously tailor data transformations and guarantee data compatibility when exchanging information between suppliers, freight forwarders, customers, customs authorities, and financial institutions.
Best Practices
To ensure successful data translations with your mappings and Flows:
Test the Flow with sample data before going live.
Document your mapping decisions for future reference.
Use descriptive names for your mappings.
Additional Resources
This article explores the general usage and functionality of the Custom Mapping Tool.
- For more information on the Custom Mapping Tool functionality, watch our Custom Mapping Tool Overview video.
- For more information on mapping EDI files, refer to the Mapping EDI Files in the Custom Mapping Tool support article.
- For more information on mapping XML files, refer to the Mapping XML Files in the Custom Mapping Tool support article.
Accessing the Custom Mapping Tool
To utilize Chain.io's Custom Mapping tool, first sign in to your Chain.io portal account at https://portal.chain.io/.
- At the top menu bar, click Workspaces and select the desired Workspace.
- At the top right of the screen, click Workspace Settings from the hamburger menu.

- Navigate to the Developer Center subsection.

- Click Custom Mapping Tool.
Use the Custom Mapping tool to create, edit, and manage your data mappings. If you have an existing mapping, it will appear in the table on the Workspace Maps page.
Click edit on the row of an existing mapping to edit it in the Custom Mapping tool or create a new mapping. The Custom Mapping tool uses a two-column layout:
- Left column — Sample Input and Output Preview - The left side of the editor stacks two panels vertically. The top panel is where you input your source data, either by uploading a file or pasting it directly. Accepted formats are JSON, XML, CSV, and EDI. The bottom panel shows the output preview, which updates in real-time as you edit your JSONata expression.
- Right column — JSONata Expression Editor - The right side contains the JSONata expression editor where you write your transformation logic. A template appears automatically after you select an output file type. Refer to our Guide to JSONata Mapping Expressions for more information on how to craft JSONata expressions. The AI Mapping Assistant panel also lives in this column, below the expression editor.
All dividers between panels are resizable — drag them to customize the layout to fit your workflow
 Creating a New Mapping
- Create a new blank mapping by clicking the blue "New Standard Mapping" button above the tool table on the right side of the page. You may also utilize the "New Inbound EDI" button to use an AI guided builder.
- You can edit the mapping's name by clicking the into the name field, updating the name and clicking the save icon. For the purposes of this example, we are using a simple naming convention; however, it is helpful to provide a descriptive name for your mapping so it is easily identifiable in your Flow configurations.

- Next, populate the "JSON Data" panel on the top left to populate the source data that your mapping will transform.
- If you have a sample file available on your computer, you can use the "Choose File" button to load it into the editor.
- Within the "Output" panel below the "JSON Data" , you can select the output file type. The options are JSON, CSV, and XML
- For the output file, you can select a Mapping Target from a list of common logistics file formats, like EDI or JSON.
You can pre-populate your JSONata Expression panel with a sample structure based on an existing JSON file. You can also use choose a file type from the the Select a Mapping Target dropdown list.
Editing a Mapping
To edit an existing mapping, begin at the Custom Mapping Tool page.
- Find the name of the mapping that you wish to edit.
- Click Edit on the right side of the mapping row.
- In the Custom Mapping tool, edit the mapping's name if necessary, by clicking the mapping name, making your change and clicking the save icon to the right of the text box.
- Edit the JSONata expression to customize your solution. You can write expressions by hand, or use the AI Mapping Assistant to generate them from a plain-English description. The Output panel on the lower left updates in real-time, so you will know instantly if your mapping is working and what data is flowing through.
JSONata Cheatsheet
To access a quick reference guide on JSONata, consult this JSONata Cheatsheet. This link is also available on the Custom Mapping Tool page.
AI Mapping Assistant
The mapping editor includes an AI assistant that helps you write JSONata expressions through plain-English conversation. Instead of writing expressions from scratch, you can describe what you want the transformation to do and the assistant will generate the expression for you.
Opening the Assistant
Click the sparkles (✨) icon in the JSONata editor toolbar to open the AI chat panel. It appears below the expression editor as a resizable panel — drag the divider to adjust how much space it takes up. Click the icon again to close it.
 Describing a Transformation
Type a description of the transformation you need into the chat input at the bottom of the panel. For example, you might type "map the shipment ID and destination address to the output" or "filter out items where the quantity is zero." The assistant understands the context of your mapping automatically — it can see your sample input data, your current expression, any lookup tables you have defined, and available global functions.
If you are not sure where to start, click one of the suggestion chips that appear in an empty chat. These cover common tasks like mapping fields, filtering data, transforming dates, looking up values, and aggregating data.
Working with Suggested Expressions
When the assistant generates an expression, it appears in a styled card with two actions:
- Copy — copies the expression to your clipboard so you can paste it wherever you need it.
- Use Expression — inserts the expression directly into the JSONata editor. This action is fully undoable with Ctrl+Z (or Cmd+Z on Mac), so you can safely try it and revert if needed.
Automatic Validation
Every expression the assistant generates is automatically evaluated against your sample input data. If the expression works, you will see a green success card showing a preview of the output. If there is an error, a red card appears with details about what went wrong. When an error occurs, the assistant will attempt to fix the expression on its own — it can retry up to three times before asking you for more guidance.
Refining Your Results
The assistant keeps track of your conversation, so you can ask follow-up questions to refine an expression. For example, after receiving an initial result you might say "make the date format ISO 8601" or "add a fallback value when the field is missing." Each response builds on the previous context.
Chat Persistence
Your conversation with the assistant is saved automatically and restored when you return to the same mapping, even after closing the browser. Each mapping maintains its own separate conversation history. To start a fresh conversation, click the "New conversation" button at the top of the chat panel.
Adding a Lookup Table
Lookup Tables are helpful to translate codes. Event codes are an example of types of codes that are commonly translated. Other examples of codes that can be translated include package type, organization, and container type.
Example
CargoWise uses the codes DEP for departure and ARV for arrival, while EDI codes are usually expressed as VD for departure and VA for arrival. To send an event from CargoWise to output an EDI 315, which includes status details, you would upload a Lookup Table that you previously created, or insert the values in the Lookup Table manually within the Custom Mapping tool to convert the DEP to VD.
CargoWise uses the codes DEP for departure and ARV for arrival, while EDI codes are usually expressed as VD for departure and VA for arrival. To send an event file from CargoWise to output as an EDI 315, which includes status details, you can upload a Lookup Table CSV file that you previously created, or insert the values into the Lookup Table manually to convert all instances of DEP to VD and instances of ARV to VA.
To add a Lookup Table, begin in the Mapping Editor.
- In the upper right area of the page is the Lookup Tables section. Click the blue “+” on the right to add a Lookup Table.

- Assign a meaningful table name - this will be how you reference the values in the table from your JSONata expression
- Name the columns you will have in your table.
- All tables must have at least 2 columns.
- You may add additional columns to the table by naming the rightmost blank column in the table and saving it.
- Add data to your table by clicking into the data rows and typing the values you wish to add.
- For larger data sets, you may also use the "CSV Upload" to import the data from a CSV file into the table.
- If you wish to export your table data, use the "CSV Download" button.
- Once you have all the data you require in the table, click the "Save Table" button and you will be able to reference the lookup table in your mapping.
The easiest way to utilize a lookup table in your mapping is to ask the AI Assistant to add it for you into the appropriate output value.
Versioning and Deployment
The Save feature allows for version control of your mapping.
- You can save multiple versions of a mapping by clicking the blue "Save" button. Revert to a different version of the mapping by selecting the drop-down list next to "All Revisions".

- To make a version available to use in a Flow, deploy it by clicking the blue "Save & Deploy" button.
The pop-up window will give you the opportunity to name the version and enter any deployment / change notes you wish to make. These notes are a good spot to store your mapping change logs as you fix issues or add to the mapping. - Confirm the deployment by clicking the blue "Create Version" button. You will now be able to reference this mapping in the flow configuration.
Manage Flow
The "Manage Flow" button will show you all the flows that are utilizing this mapping. It also provides an "Update Mapping to Latest Version & Deploy" button that will allow you to modify the flow configuration to set the mapping to the latest deployed revision and deploy the flow - all in a single button press.
If the button is disabled, hover over it and it will give you the reason why this functionality is not available for this flow.
Deleting a Mapping
To remove a mapping from your account:
- Begin on the Custom Mapping Tool page. Click “delete” on the right of the mapping row.
- Confirm the mapping deletion by clicking the Delete button.

The mapping can be deleted as long as it is not already associated with a Flow.
Deleting a Mapping Currently Used in a Flow
If you attempt to delete a mapping that is currently associated with an enabled Flow, an error message will appear stating "Cannot Delete Mapping." The name of the Flow associated with the mapping you attempted to delete will appear at the bottom of the pop-up window. The mapping must be unassociated with a Flow and the Flow must be disabled in order to delete the mapping.
- Click the associated Flow name to edit the Flow details.
- Deselect the mapping from the Flow.
- Within the menu on the right side of the page, click Save, to save changes to the Flow.
- Within the same menu, click Deploy, to activate the changes to the Flow.
- Within the same menu click Disable Flow.
- At the top right of the screen, click Workspace Settings from the hamburger menu.
- Scroll down to Developer Center.
- Click Custom Mapping Tool.
- Click delete on the right of the mapping row to delete the mapping.
Using a Custom Mapping In A Flow
To implement a custom mapping within a Flow:
- At the top menu bar, click Integrations.
- If you have existing Integrations, select the desired Integration. Refer to the Integrations article for more information on creating new Integrations.
- At the top right of the window, click Workspace Settings from the hamburger menu.
- If you have an existing Flow configuration, select the desired Flow.
Refer to the Creating A Basic Flow article for more information on how to configure a Flow within an Integration. - Navigate to the Custom Processors section.
- Within the Input File Map and Output File Map fields, select the appropriate mapping to associate with the Flow.
Note: EDI files are not able to be selected in the pre-processor and post-processor fields.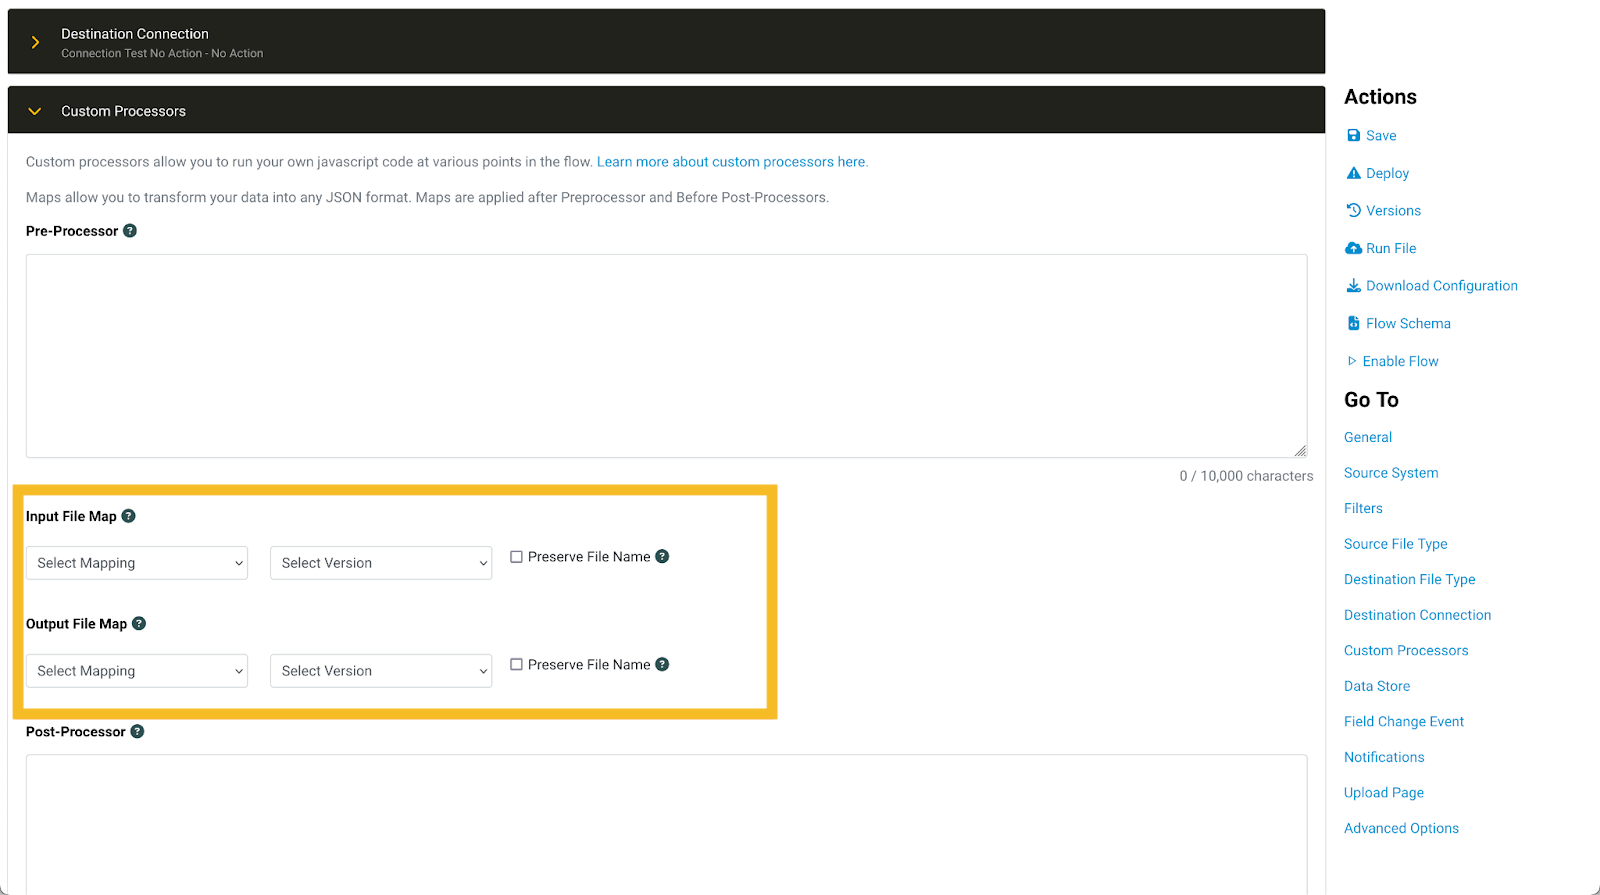
- Select the appropriate version of each mapping.
- By default, Chain.io names each processed file using the following format: {file_name}_{map_name}_{map_version}_{milliseconds}.json.
If you prefer to retain the original filename, check the Preserve File box. - Click Save to confirm your custom mapping configuration.
- Click Deploy to initiate the Flow's employment of the mapping.
Learn more about configuring Flows here.
Next: Mapping Data In The Chain.io Mapping Editor
Was this article helpful?
That’s Great!
Thank you for your feedback
Sorry! We couldn't be helpful
Thank you for your feedback
Feedback sent
We appreciate your effort and will try to fix the article